
Winter Nails Acrylic 2024 – 2025: 24 Trendy Ideas for Square, Almond & Short Styles
Winter is the perfect time to experiment with bold and festive nail designs. Whether you’re looking for an elegant design for a formal event or a fun manicure for Christmas and New Year’s, the winter nails acrylic 2024 – 2025 trends offer something unique for everyone. In this article, we’ll explore stylish nail ideas that range from square to almond and oval shapes. You’ll discover which colors and designs are trending, as well as how to recreate them at home.
Cute Pink Bunny Nails
These long square nails feature a playful and adorable design perfect for those who enjoy fun, whimsical looks. The pastel pink base is adorned with a simple black heart and an illustrated bunny character, giving the manicure a cute, youthful vibe. This design is ideal for anyone looking for a creative nail style that’s fun yet stylish.

- Shape: Long square.
- Colors: Soft pink, black, with bunny artwork.
- Designs: Cute bunny and heart accents.
Necessary Consumables for Creating the Design:
- Base color: Essie Gel Couture ‘Back in the Saddle’
- Black heart and bunny decals: Kiss Nail Art Stickers
- Topcoat for protection: Seche Vite Dry Fast Top Coat
Instructions to Create the Design at Home:
- Start with the soft pink base on all nails.
- Apply the black heart and bunny decals on select nails.
- Seal with a topcoat to ensure long-lasting wear.
Red and White Winter Florals
This long almond design incorporates rich red tones with delicate floral accents in white. The nails exude a holiday and festive feel, perfect for Christmas and birthday celebrations during the winter months. The classic red color is chic and timeless, while the minimalist white floral design adds an elegant, unique touch to the overall look.

- Shape: Long almond.
- Colors: Rich red with white floral accents.
- Designs: Simple floral designs with bold red polish.
Necessary Consumables for Creating the Design:
- Base color: OPI Nail Lacquer ‘Big Apple Red’
- White nail art pen or stamp: Kiss Nail Art Pen in White
- Topcoat for shine: Essie Gel Couture Top Coat
Instructions to Create the Design at Home:
- Apply red polish to all nails.
- Use the white nail art pen to create floral designs on selected nails.
- Seal the design with a topcoat for protection.
Dark Green Festive Nails
This short square nail design features dark green polish with silver and snowflake accents, making it an ideal winter choice. The dark green is a trendy neutral color for the season, while the silver glitter and snowflakes bring in a festive holiday feel. These nails strike a balance between elegant and festive, making them perfect for formal events or casual holiday gatherings.

- Shape: Short square.
- Colors: Dark green, silver, and white accents.
- Designs: Snowflakes and glitter accents.
Necessary Consumables for Creating the Design:
- Base color: Essie Gel Couture ‘Off Tropic’
- Silver glitter polish: China Glaze ‘Fairy Dust’
- Snowflake nail art pen: MoYou London Christmas Stamping Plate
- Topcoat for protection: Seche Vite Dry Fast Top Coat
Instructions to Create the Design at Home:
- Start with a dark green base on all nails.
- Add silver glitter accents to a few nails and snowflake designs on others.
- Seal the design with a topcoat for durability.
Elegant Glitter Winter Nails
If you’re looking for simple short nails that still have a touch of glamour, these glittery short square nails are the perfect winter choice. The deep burgundy color paired with subtle snowflake accents is ideal for the winter season. The design strikes the right balance between understated and festive, making it suitable for both casual and formal occasions.
- Shape: Short square.
- Colors: Burgundy and silver glitter.
- Designs: Snowflakes and glitter accents for a wintery feel.
Necessary Consumables for Creating the Design:
- Base color: OPI Nail Lacquer ‘Malaga Wine’
- Silver glitter: CND Vinylux ‘Emerald Lights’
- White nail art polish: Essie Gel Couture ‘Pre-Show Jitters’
Instructions to Create the Design at Home:
- Apply a base coat, followed by two coats of burgundy polish.
- On the accent nails, apply silver glitter for extra shine.
- Use white nail art polish to draw small snowflakes on a few nails.
- Finish with a topcoat to protect the design and add shine.
Minimalist Short Almond Nails
These short almond nails are a beautiful example of minimalist winter elegance. The deep red polish combined with subtle glitter accents gives the design a wintery yet sophisticated touch. This style is ideal for those looking for unique but simple ideas that can be worn daily or to holiday parties. The contrast between the dark red and silver accents brings a dynamic look while keeping it classy.

- Shape: Short almond.
- Colors: Dark red with silver accents.
- Designs: Minimalist with subtle glitter.
Necessary Consumables for Creating the Design:
- Base color: OPI Nail Lacquer ‘Stay Off the Lawn!’ (Dark Green)
- Glitter: China Glaze ‘Fairy Dust’
- Topcoat: Seche Vite Dry Fast Top Coat
Instructions to Create the Design at Home:
- Start by applying a base coat.
- Apply dark red polish to all nails.
- Add a touch of glitter to the accent nails for a festive feel.
- Finish with a topcoat to seal the design.
Sophisticated Neutral Winter Nails
This elegant, neutral-toned design highlights almond-shaped nails with a subtle shimmer and an intricate white leaf pattern on the accent nail. The combination of matte and shimmery textures gives these nails a classy and sophisticated look, perfect for formal events or those who prefer a minimalist yet chic winter manicure. The soft, neutral colors are ideal for anyone looking to keep things simple but refined.

- Shape: Almond.
- Colors: Beige with silver shimmer and white accent designs.
- Designs: A leaf pattern on the accent nail, adding depth and texture.
Necessary Consumables for Creating the Design:
- Base color: OPI Nail Lacquer in ‘Be There in a Prosecco’
- Shimmer topcoat: Essie Gel Couture ‘Gossamer Garments’
- White nail art gel for the leaf design: Madam Glam ‘Perfect White’
Instructions to Create the Design at Home:
- Apply a base coat followed by the beige base color on all nails.
- Use a fine nail art brush to create the leaf design on the accent nail with white gel polish.
- Add a touch of shimmer to the other nails using a shimmer topcoat.
- Seal with a glossy topcoat for a long-lasting finish.
Cozy Winter Sweater-Inspired Nails
This adorable design is perfect for those cozy winter vibes. The combination of light lavender and blush pink tones is beautifully complemented by raised, sweater-inspired textures and delicate snowflakes. The matte finish on the long square nails adds an extra layer of chicness to this look. This design is perfect for anyone wanting to embrace the winter season in a playful and trendy way, especially for Christmas or birthday celebrations.

- Shape: Long square.
- Colors: Light lavender and blush pink.
- Designs: Sweater-inspired texture with raised 3D elements and snowflakes.
Necessary Consumables for Creating the Design:
- Base color: Essie Nail Polish ‘Lilacism’ and ‘Fiji’
- Matte topcoat: OPI Matte Top Coat
- 3D gel for sweater patterns: Madam Glam 3D Sculpting Gel
- Nail stamping plate for snowflakes: MoYou London Christmas Collection Plate
Instructions to Create the Design at Home:
- Paint all nails with the base colors (lavender and pink).
- Use 3D sculpting gel to create sweater-like raised patterns on select nails.
- Stamp snowflakes on other nails with a white polish.
- Apply a matte topcoat to achieve a soft, non-glossy finish.
Glamorous Burgundy Glitter Nails
For those who love long square nails, this glamorous burgundy glitter design is a showstopper. With deep burgundy tips and sparkling rhinestones, these nails bring the drama perfect for a formal event or a birthday celebration. The combination of nude base and burgundy glitter French tips gives the design a luxurious feel, while the rhinestone embellishments add a stunning, sparkling detail.

- Shape: Long square.
- Colors: Nude and burgundy glitter.
- Designs: Burgundy French tips with rhinestone accents.
Necessary Consumables for Creating the Design:
- Base color: OPI Nail Lacquer ‘Bubble Bath’
- Burgundy glitter polish: China Glaze Nail Lacquer ‘Ruby Pumps’
- Rhinestones: Swarovski Nail Crystals
- Nail glue for rhinestones: Super Nail Rhinestone Adhesive
Instructions to Create the Design at Home:
- Apply a nude base color to all nails.
- Create burgundy French tips using a glitter polish.
- Apply rhinestones on accent nails using nail glue.
- Seal with a glossy topcoat to lock in the design.
Snowy French Tips with Almond Shape
This almond-shaped French manicure with a wintery twist is perfect for the holiday season. The white tips, combined with delicate snowflake designs, create a frosty yet elegant look. The glittery finish on some of the nails adds sparkle, making this a festive choice for Christmas and other winter gatherings. The simple short almond shape keeps the design practical yet stylish.

- Shape: Short almond.
- Colors: Nude base with white tips and snowflake designs.
- Designs: French tips with glitter accents and snowflake details.
Necessary Consumables for Creating the Design:
- Base color: Essie Nail Polish ‘Ballet Slippers’
- White French tip polish: OPI ‘Alpine Snow’
- Nail glitter for accents: CND ‘Sparkling Snow’
- Thin nail art brush for snowflakes: Winstonia Nail Art Brush Set
Instructions to Create the Design at Home:
- Start with a base coat, followed by a nude polish on all nails.
- Create French tips with white polish on the tips.
- Use a thin brush to draw snowflakes on a few nails.
- Add a touch of glitter to enhance the frosty look and finish with a topcoat.
Elegant Blue Winter Nails with Rhinestones
These elegant oval-shaped nails feature a beautiful gradient of shimmering blue French tips, adorned with delicate rhinestones for a touch of sparkle. This design is ideal for both formal and casual winter events, offering a unique take on traditional French manicures. The subtle glitter paired with nude and blue tones creates a harmonious winter wonderland feel.

- Shape: Oval.
- Colors: Nude base with shimmering blue French tips.
- Designs: Rhinestone embellishments for added elegance.
Necessary Consumables for Creating the Design:
- Base color: OPI Nail Lacquer ‘Samoan Sand’
- Blue glitter polish: China Glaze ‘Frostbite’
- Rhinestones: Swarovski Crystal Nail Art Stones
- Nail glue for rhinestones: KDS Nail Glue
Instructions to Create the Design at Home:
- Apply a nude base color and let it dry.
- Create blue glitter French tips using a fine brush.
- Attach rhinestones on select nails for extra sparkle.
- Seal with a glossy topcoat for shine and longevity.
Elegant White Winter Bow Nails
This design embraces a winter wonderland aesthetic, with long square nails featuring white bows, snowflakes, and subtle glitter accents. The intricate detailing, including delicate dots and lines, gives the nails a festive yet classy look. The overall vibe is perfect for the Christmas season, adding an elegant touch to any outfit with these clean, sophisticated nail art choices.

- Shape: Long square.
- Colors: White with silver accents.
- Designs: Bows, snowflakes, and glitter with a polished, festive feel.
Necessary Consumables for Creating the Design:
- Base color: Essie Nail Polish ‘Blanc’
- Silver glitter for accents: CND ‘Silver Chrome’
- White nail art pen for bows and snowflakes: Kiss Nail Art Pen in White
- Topcoat for long-lasting shine: Seche Vite Dry Fast Top Coat
Instructions to Create the Design at Home:
- Start with a white base color on all nails.
- Use a fine brush to create bows and snowflakes on select nails.
- Add silver glitter to the tips or accent nails for a touch of sparkle.
- Finish with a high-gloss topcoat for extra shine and protection.
Gold-Accented Snowflake Nails
This design combines soft white gradients with luxurious gold accents, perfect for a winter celebration or formal event. The short square nails feature delicate snowflakes and a touch of gold glitter at the base, adding a glamorous feel. The ombré effect blends smoothly into the white design, making these nails an ideal choice for anyone looking for subtle elegance during the winter season.

- Shape: Short square.
- Colors: White and gold.
- Designs: Snowflakes with gold glitter detailing.
Necessary Consumables for Creating the Design:
- Base color: OPI Nail Lacquer ‘Funny Bunny’
- Gold glitter: Sally Hansen ‘Golden-I’
- Snowflake stamps or hand-painting tools: MoYou Snowflake Stamping Plate
- Topcoat for smoothness: OPI Gel Top Coat
Instructions to Create the Design at Home:
- Apply an ombré base using a soft white polish.
- Use gold glitter at the base of each nail for a luxurious finish.
- Apply snowflake designs with a stamping tool or freehand using a thin brush.
- Seal with a gel topcoat for longevity.
Winter Wonderland Blue Nails
These oval-shaped nails feature a stunning ombré effect transitioning from nude to a deep blue, adorned with snowflakes and small silver accents. The design is bold yet elegant, perfect for making a statement this winter. The shimmering gradient and rhinestone details give the nails a sparkling, frosty finish that fits perfectly with winter nail trends for 2024 – 2025.

- Shape: Oval.
- Colors: Nude to blue ombré.
- Designs: Snowflakes and silver accents for a frosty winter feel.
Necessary Consumables for Creating the Design:
- Base color: OPI Nail Lacquer ‘Bubble Bath’
- Blue ombré polish: China Glaze ‘Up All Night’
- Rhinestones: Swarovski Nail Rhinestones
- Snowflake stamps or hand-painting tools: UberChic Snowflake Nail Stamping Plate
Instructions to Create the Design at Home:
- Create a gradient ombré from nude to blue using a sponge.
- Add snowflake designs on the blue tips using a nail stamping plate or fine brush.
- Apply rhinestones with nail glue on accent nails.
- Finish with a glossy topcoat for shine and protection.
Festive Evergreen Nails
These short oval nails offer a playful, festive look with hand-painted evergreen trees and white snowflakes. The design is a great option for someone looking for something more fun and simple during the holiday season. The light nude base keeps the nails clean and minimal, while the green and white designs add just the right amount of holiday spirit.

- Shape: Short oval.
- Colors: Nude, green, and white.
- Designs: Evergreen trees and snowflakes for a festive look.
Necessary Consumables for Creating the Design:
- Base color: Essie Nail Polish ‘Ballet Slippers’
- Green nail art pen: Sally Hansen Nail Art Pen (Green)
- White nail art brush for snowflakes: Winstonia Nail Art Brush Set
- Topcoat: Seche Vite Dry Fast Top Coat
Instructions to Create the Design at Home:
- Start with a nude base color on all nails.
- Use green and white nail art pens or brushes to paint evergreen trees and snowflakes.
- Seal the design with a glossy topcoat for a smooth, long-lasting finish.
Matte Winter Nail Art
This short almond matte nail design is soft and elegant with winter-inspired details like a heart, snowflakes, and delicate lines. The neutral matte finish adds sophistication to the nails, while the subtle winter patterns bring in festive vibes. The simple short shape makes this design suitable for everyday wear, yet stylish enough for a winter occasion.

- Shape: Short almond.
- Colors: Matte neutral shades with white and silver accents.
- Designs: Snowflakes, hearts, and lines with a wintery touch.
Necessary Consumables for Creating the Design:
- Base color: Zoya Nail Polish ‘Rue’
- White nail art pen: Kiss Nail Art Pen (White)
- Matte topcoat: OPI Matte Top Coat
- Silver glitter polish: China Glaze ‘Glistening Snow’
Instructions to Create the Design at Home:
- Apply a neutral matte base to all nails.
- Use white nail art pens to add winter-themed designs like snowflakes and hearts.
- Highlight some nails with silver glitter lines for extra detail.
- Finish with a matte topcoat for a chic, velvety look.
Soft Pearl Shimmer Nails
This long square design features a soft pearl shimmer that gives an elegant, minimalist look. The nails have a natural tone but are elevated by the subtle, glowing sheen, making them perfect for both everyday wear and formal events. This style is a classic choice for anyone who wants to keep their nails simple yet sophisticated during the winter season.

- Shape: Long square.
- Colors: Pearl shimmer with a natural base.
- Designs: Minimalist, pearl-like glow.
Necessary Consumables for Creating the Design:
- Base color: OPI Nail Lacquer ‘Bubble Bath’
- Pearl shimmer topcoat: Essie ‘Pearlfection’
- Topcoat for durability: Seche Vite Dry Fast Top Coat
Instructions to Create the Design at Home:
- Start with a base coat for nail protection.
- Apply the natural base color to all nails and let dry.
- Finish with a pearl shimmer topcoat to give the nails a glowing effect.
- Apply a topcoat to seal the shine and ensure durability.
Snowy Blue and White Winter Nails
This long almond design is a stunning combination of glittery blue and frosty white, accented with snowflakes and winter-themed designs. The bold blue glitter brings a festive, Christmas feel, while the white nails with dark snowflake details add contrast and balance. These nails are perfect for winter celebrations or just to capture the holiday spirit in a stylish, eye-catching way.

- Shape: Long almond.
- Colors: Blue glitter, frosty white.
- Designs: Snowflakes and glitter accents.
Necessary Consumables for Creating the Design:
- Blue glitter polish: China Glaze ‘Frostbite’
- White base color: Essie ‘Blanc’
- Snowflake nail art stamps or brushes: MoYou Snowflake Stamping Plate
- Topcoat for protection: OPI Gel Top Coat
Instructions to Create the Design at Home:
- Apply blue glitter polish to selected nails and white polish to the others.
- Use a stamping tool or fine brush to create snowflake designs on the white nails.
- Apply a topcoat for shine and long-lasting wear.
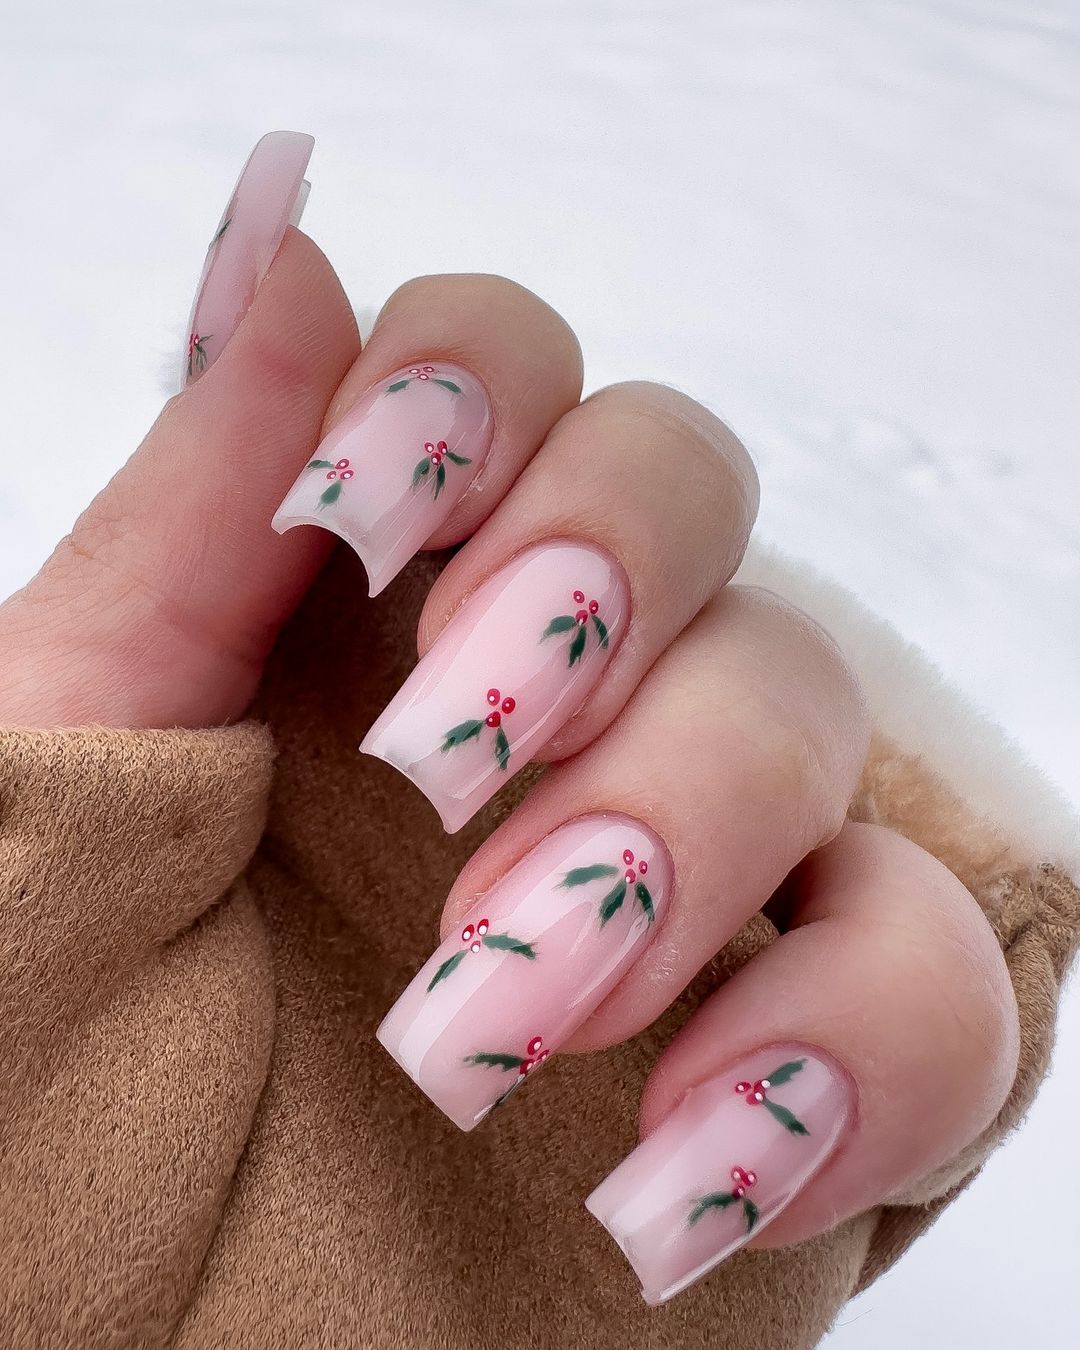
Holly Berry Holiday Nails
These long square nails feature a clean and minimalist look with delicate holly berry designs scattered across the nails. The soft pinkish-nude base keeps the design understated, while the small green leaves and red berries add just the right amount of holiday flair. This is an ideal design for someone looking for something festive but subtle for the winter season.

- Shape: Long square.
- Colors: Nude base with red and green accents.
- Designs: Holly berries and leaves for a Christmas-inspired look.
Necessary Consumables for Creating the Design:
- Base color: OPI Nail Lacquer ‘Bubble Bath’
- Green and red nail art pens: Kiss Nail Art Pens (Green and Red)
- Topcoat for protection: Seche Vite Dry Fast Top Coat
Instructions to Create the Design at Home:
- Apply the soft nude base color to all nails.
- Use the nail art pens to draw small holly berry designs on each nail.
- Seal the design with a topcoat to keep it looking fresh.
Icy Snowflake Nails
This long almond design is all about the winter frost with pale blue tones and delicate 3D snowflake designs. The textured white snowflakes add depth to the look, while the icy blue shade captures the essence of the winter season. This design is perfect for holiday parties or as a unique winter nail idea for 2024 – 2025.

- Shape: Long almond.
- Colors: Pale blue and white.
- Designs: 3D snowflakes and frosty texture.
Necessary Consumables for Creating the Design:
- Base color: Essie Gel Couture ‘Pre-Show Jitters’
- White 3D gel for snowflakes: Madam Glam 3D Gel
- Nail art brush for details: Winstonia Nail Art Brush Set
- Topcoat for shine and durability: Seche Vite Dry Fast Top Coat
Instructions to Create the Design at Home:
- Start by applying the pale blue base color to all nails.
- Use 3D gel to create textured snowflakes on select nails.
- Seal with a topcoat to keep the design in place.
Candy Cane Holiday Nails
These long stiletto nails are a festive treat, featuring a candy cane design in red and white stripes, combined with shimmering rose gold details. The mix of solid red, glitter, and stripes brings the holiday spirit to life, making these nails perfect for Christmas and birthday celebrations during the winter. The rose gold glitter adds a touch of glamour to this playful design.

- Shape: Long stiletto.
- Colors: Red, white, and rose gold.
- Designs: Candy cane stripes and glitter accents.
Necessary Consumables for Creating the Design:
- Base color: OPI Nail Lacquer ‘Big Apple Red’
- White striping tape or nail art pen: Kiss Nail Art Pen in White
- Rose gold glitter polish: Sally Hansen ‘Golden-I’
- Topcoat for protection: OPI Gel Top Coat
Instructions to Create the Design at Home:
- Apply red polish on select nails, alternating with white candy cane stripes.
- Use rose gold glitter for accent nails to add a shimmer.
- Apply a topcoat for durability and shine.
Mint Green Sweater Nails
These long square nails offer a chic and cozy winter look with a mint green color palette and intricate sweater patterns. The design incorporates a mix of solid mint green, sweater textures, and snowflake accents. The playful mix of 3D elements and soft winter colors makes this style perfect for both casual and formal winter occasions, bringing a touch of warmth and fun to the winter nails acrylic 2024 – 2025 trends.

- Shape: Long square.
- Colors: Mint green and white.
- Designs: Sweater pattern and snowflake accents with 3D texture.
Necessary Consumables for Creating the Design:
- Base color: China Glaze ‘Highlight Of My Summer’
- 3D gel for sweater texture: Madam Glam 3D Sculpting Gel in White
- Snowflake nail art pen or stamping plate: MoYou London Christmas Collection Plate
- Topcoat: OPI Gel Top Coat for a glossy finish.
Instructions to Create the Design at Home:
- Apply mint green polish to all nails and allow to dry.
- Use 3D sculpting gel to create the sweater knit pattern on select nails.
- Add snowflake details using a nail art pen or stamping tool.
- Seal with a topcoat for a long-lasting, textured effect.
Cute Christmas Character Nails
This adorable long square nail design features a festive holiday theme with intricate Christmas characters and decorations, including bows, candy canes, and a cute Santa fox. The base is a soft nude, allowing the detailed hand-painted art to stand out. This design is ideal for anyone who wants to embrace the Christmas spirit with a fun and creative nail look during the holiday season.

- Shape: Long square.
- Colors: Nude, red, white, and black.
- Designs: Christmas-themed characters like candy canes, bows, and a Santa fox.
Necessary Consumables for Creating the Design:
- Base color: OPI Nail Lacquer ‘Bubble Bath’
- Red, black, and white nail art pens: Kiss Nail Art Pens (Red, Black, White)
- Fine nail art brushes for detailed work: Winstonia Nail Art Brush Set
- Topcoat for shine and protection: Essie Gel Couture Top Coat
Instructions to Create the Design at Home:
- Apply the nude base color to all nails.
- Use the nail art pens and brushes to draw Christmas characters and decorations.
- Seal the design with a topcoat to ensure it lasts throughout the holiday season.
Winter Red and White Sweater Nails
This long square nail design combines the cozy vibes of a knitted sweater pattern with bold red and white winter colors. The red accent nail brings a vibrant holiday feel, while the other nails are detailed with 3D sweater patterns, subtle snowflakes, and soft glitter for an added wintery touch. This design is great for a Christmas party or any festive event.

- Shape: Long square.
- Colors: Red, white, and soft pink.
- Designs: Sweater pattern, snowflakes, and subtle glitter accents.
Necessary Consumables for Creating the Design:
- Red base color: OPI Nail Lacquer ‘Big Apple Red’
- White 3D gel for sweater patterns: Madam Glam 3D Gel in White
- Snowflake stamps or fine brushes: MoYou London Christmas Collection Plate
- Glitter polish: Essie ‘Set in Stones’
- Topcoat: Seche Vite Dry Fast Top Coat for a glossy, long-lasting finish.
Instructions to Create the Design at Home:
- Paint the accent nail red and the rest white or soft pink.
- Create 3D sweater patterns on select nails using 3D gel.
- Add glitter polish to a couple of nails for a festive sparkle.
- Finish with a topcoat to protect the design and give it a shine.
Blue Icy Snowflake Nails
These long almond nails create a frosty winter look with shimmering blue and white tones, topped off with delicate snowflake designs. The icy chrome-like finish on some nails adds a futuristic winter vibe, while the textured snowflakes provide a playful and festive touch. The overall look is perfect for those wanting a bold yet wintery nail design for the 2024 – 2025 season.

- Shape: Long almond.
- Colors: Icy blue and white.
- Designs: Snowflakes with chrome accents.
Necessary Consumables for Creating the Design:
- Base color: Essie Gel Couture ‘Satin Slipper’
- Chrome powder for shimmer: Born Pretty Chrome Powder
- Snowflake nail art pens: Kiss Nail Art Pen in White
- Topcoat: OPI Gel Top Coat for sealing and shine.
Instructions to Create the Design at Home:
- Apply a base of icy blue or white polish.
- Dust chrome powder on select nails for a futuristic finish.
- Use a fine brush or stamping tool to add snowflake designs.
- Seal the design with a topcoat to ensure long wear and brilliance.
Save Pin
