
20 Short Winter Nail Ideas for 2024 – 2025: Round, Almond, and Coffin Shapes
As we head into the colder months of 2024 and 2025, one thing is clear: short winter nails are here to stay. Whether you prefer a minimalist look or crave a little sparkle, this season’s trends are versatile enough for anyone. So, what can we expect in terms of shapes, colors, and designs? How can you create these looks at home? Let’s explore the top nail inspirations that will define winter nail fashion.
Elegant Glossy Round Nails
This look is the epitome of simplicity meets elegance. The round acrylic shape adds a softness to the fingers, making it ideal for short nails. The neutral color choice enhances the natural beauty of the nails, offering a timeless look perfect for any occasion. The glossy finish gives it an extra touch of class without overdoing it, making it one of the best choices for those who love simple yet classy designs.

Consumables for this look:
-
- Essie Gel Couture in “Sheer Fantasy”
- OPI Infinite Shine Gloss Top Coat
- Cuticle oil (Sally Hansen Vitamin E Cuticle Oil)
How to create this look at home:
-
- File your nails into a round shape, ensuring a smooth, symmetrical finish.
- Apply a base coat and follow with two coats of Essie Gel Couture in “Sheer Fantasy.”
- Let each layer dry fully before sealing the design with a high-gloss top coat.
- Finish off by massaging cuticle oil around the nail beds to lock in hydration.
Winter Snowflake French Tips
This design features French tips with an artistic winter twist. The snowflake details at the tips add a playful yet classy vibe. Ideal for short winter nails, the design is both subtle and eye-catching. The contrast of natural nail color and detailed snowflakes creates an artistic balance, making it perfect for holiday gatherings.

Consumables for this look:
-
- French manicure kit (Kiss Everlasting French Manicure Kit)
- White nail art pen or brush (OPI Nail Art Brush Kit)
- Clear top coat (Sally Hansen Mega Strength Hardener)
How to create this look at home:
-
- Start by filing your nails into a squoval or round shape for a clean canvas.
- Apply the French tips using a stencil or freehand with a white nail art pen.
- Draw delicate snowflakes using a fine nail art brush on the tips.
- Seal the look with a clear top coat for added shine and durability.
Matte Gray Almond Nails with Snowflake Accent
Gray nails are trending for winter, and these matte almond-shaped nails feature a cool-toned base with a snowflake accent. The mix of almond acrylic and matte texture elevates the design, making it both trendy and pretty. The addition of a snowflake gives it a festive touch without overpowering the look.

Consumables for this look:
-
- Zoya Matte Velvet Lacquer in “Dovima”
- Snowflake nail stickers (Essie Nail Stickers – Snow Day)
- OPI Matte Top Coat
How to create this look at home:
-
- Shape your nails into an almond style and apply a base coat.
- Use Zoya’s “Dovima” for that sleek, matte gray base.
- Apply a snowflake sticker on the accent nail and seal with OPI’s matte top coat.
- Be sure to allow ample drying time between layers to avoid smudging.
Burgundy Nails with Subtle Winter Accent
Burgundy is always in for winter, and this square acrylic design is no exception. The deep burgundy shade is both classy and trendy. A single snowflake design on one nail brings just the right amount of winter magic to this otherwise polished look, ideal for short winter nails.

Consumables for this look:
-
- Essie Gel Couture in “Bordeaux”
- Snowflake nail stamp (MoYou London Snowflake Stamping Plate)
- High-gloss top coat (Seche Vite Dry Fast Top Coat)
How to create this look at home:
-
- Shape your nails into a square acrylic style.
- Apply two coats of Essie Gel Couture in “Bordeaux” for a rich, luxurious base.
- Use a snowflake stamp for a delicate winter accent on one nail.
- Finish with a high-gloss top coat to seal the design and add durability.
Knitted Texture with Snowflakes
This creative design combines the popular knitted nail art texture with soft, wintery shades of gray and white. The coffin shape adds an extra level of sophistication, while the snowflakes offer a cute seasonal accent. This design is perfect for someone looking for a trendy yet natural winter nail design.

Consumables for this look:
-
- CND Vinylux Weekly Polish in “Asphalt”
- Acrylic powder (Young Nails Acrylic Powder Core White)
- Nail art brush (Makartt Nail Art Brush Set)
How to create this look at home:
-
- File your nails into a coffin shape and apply a base coat.
- Use acrylic powder to create a 3D knitted texture on your accent nails.
- Add small, delicate snowflakes using a nail art brush.
- Seal the design with a matte top coat for a chic finish
Glitter French Almond Nails
These almond-shaped nails perfectly balance pretty and elegant with a glossy base and sparkling silver tips. The subtle gradient of glitter from the tips down creates a winter wonderland effect, ideal for the season’s festivities. The combination of round acrylic nails and glitter makes this design both trendy and versatile for any winter occasion.

Consumables for this look:
-
- OPI Nail Lacquer in “Bubble Bath” for the base
- Glitter top coat (Essie “Set in Stones”)
- Almond nail tips (KISS Full-Cover Almond Nails)
- Nail glue (Makartt Nail Glue)
How to create this look at home:
-
- Shape your nails into an almond style and apply a clear base coat.
- Paint two layers of OPI’s “Bubble Bath” for a neutral pink base.
- Apply glitter to the tips, gradually fading the glitter as you move downward.
- Seal the design with a glossy top coat for a long-lasting, shiny finish.
Cozy Knitted Sweater and Plaid Nail Art
This nail design is a true inspiration for winter lovers. Combining trendy knitted textures and plaid patterns in square acrylic shapes, these short winter nails 2024 – 2025 embody coziness. The mix of matte and glossy finishes makes these nails stand out, blending winter fashion with nail art effortlessly.

Consumables for this look:
-
- Matte grey polish (Zoya “Genevieve”)
- Plaid nail stamping plate (MoYou London – Hipster Collection)
- Glitter accent polish (OPI Nail Lacquer in “Silver on Ice”)
- Knitted texture stamp or gel
How to create this look at home:
-
- Apply the matte grey polish as the base for most nails.
- Use the plaid stamping plate to create detailed plaid patterns on alternating nails.
- For the knitted texture, apply a thick layer of clear gel and stamp or freehand the design.
- Use a glitter polish on one nail for a festive touch, finishing off with a matte or glossy top coat.
Minimalist Winter Nail Art
This design offers a minimalist yet festive approach for short winter nails. Featuring delicate snowflakes, stripes, and soft beige tones, these nails are perfect for someone who loves simple yet artistic designs. The round shape of the nails ensures a natural, understated look while still capturing the essence of winter.

Consumables for this look:
-
- Base polish (Essie “Topless & Barefoot”)
- Snowflake stencil or nail art brush
- Silver glitter accent polish (OPI Infinite Shine “Silver on Ice”)
- Matte top coat (Sally Hansen Miracle Gel Matte Top Coat)
How to create this look at home:
-
- Apply a neutral beige base and let it dry completely.
- Use a fine brush or stencil to add snowflakes and stripes to alternating nails.
- Add a glitter accent on a chosen nail for a festive touch.
- Finish with a matte top coat to complete the wintery, minimalist look.
Snowy Glitter Short Nails
These short winter nails are all about sparkle! The use of clear polish with white snowflakes and glitter creates a frosty, classy look that works well for any winter occasion. This trendy design is perfect for those who want their nails to look festive yet clean and polished.

Consumables for this look:
-
- Clear base polish (OPI Nail Lacquer “Alpine Snow”)
- Snowflake stickers or stamps (Essie Nail Stickers)
- Silver glitter top coat (Essie “Set in Stones”)
How to create this look at home:
-
- Apply a clear or sheer base coat.
- Add snowflake decals or use a nail art brush to create delicate snowflakes on each nail.
- Apply a silver glitter polish for added sparkle and seal with a high-gloss top coat.
Icy Blue and Purple Shimmer Nails
This design takes inspiration from frosty, icy tones with a mix of metallic purple and gel blue. The oval shape adds a level of sophistication to this trendy winter look. Shimmering chrome polish and delicate leaf detailing make these nails stand out, making them perfect for those who love pretty and bold winter nail art.

Consumables for this look:
-
- Blue chrome polish (China Glaze “I Sea the Point”)
- Metallic purple polish (Essie “Sexy Divide”)
- Nail art brush for leaf detailing
- High-shine top coat (CND Vinylux Weekly Top Coat)
How to create this look at home:
-
- Start by shaping your nails into an oval style.
- Apply the chrome blue polish to a few nails and metallic purple to others for contrast.
- Use a fine brush to paint delicate white leaf patterns on the accent nails.
- Finish off with a high-shine top coat for that icy winter glow.
Delicate Pink Winter Stripes and Snowflakes
This manicure is all about subtlety and elegance. The short winter nails feature a soft pink base, complemented by intricate white stripes and a dainty snowflake on the accent nail. The overall design feels classy and pretty, perfect for someone who wants a more minimal winter look. The soft tones work well with round or squoval shapes, making the nails appear polished and refined.

Consumables for this look:
-
- OPI Nail Lacquer in “Bubble Bath”
- White nail art striping brush (Makartt Nail Art Brushes)
- Snowflake nail stamp (Born Pretty Snowflake Stamping Plate)
- High-shine top coat (Seche Vite Top Coat)
How to create this look at home:
-
- Shape the nails into a round or squoval style and apply two coats of OPI’s “Bubble Bath” for a soft pink base.
- Use a white striping brush to paint delicate diagonal lines on one or two nails.
- Add a snowflake stamp or carefully hand-paint a snowflake for an accent nail.
- Seal the design with a glossy top coat for a sleek and polished finish.
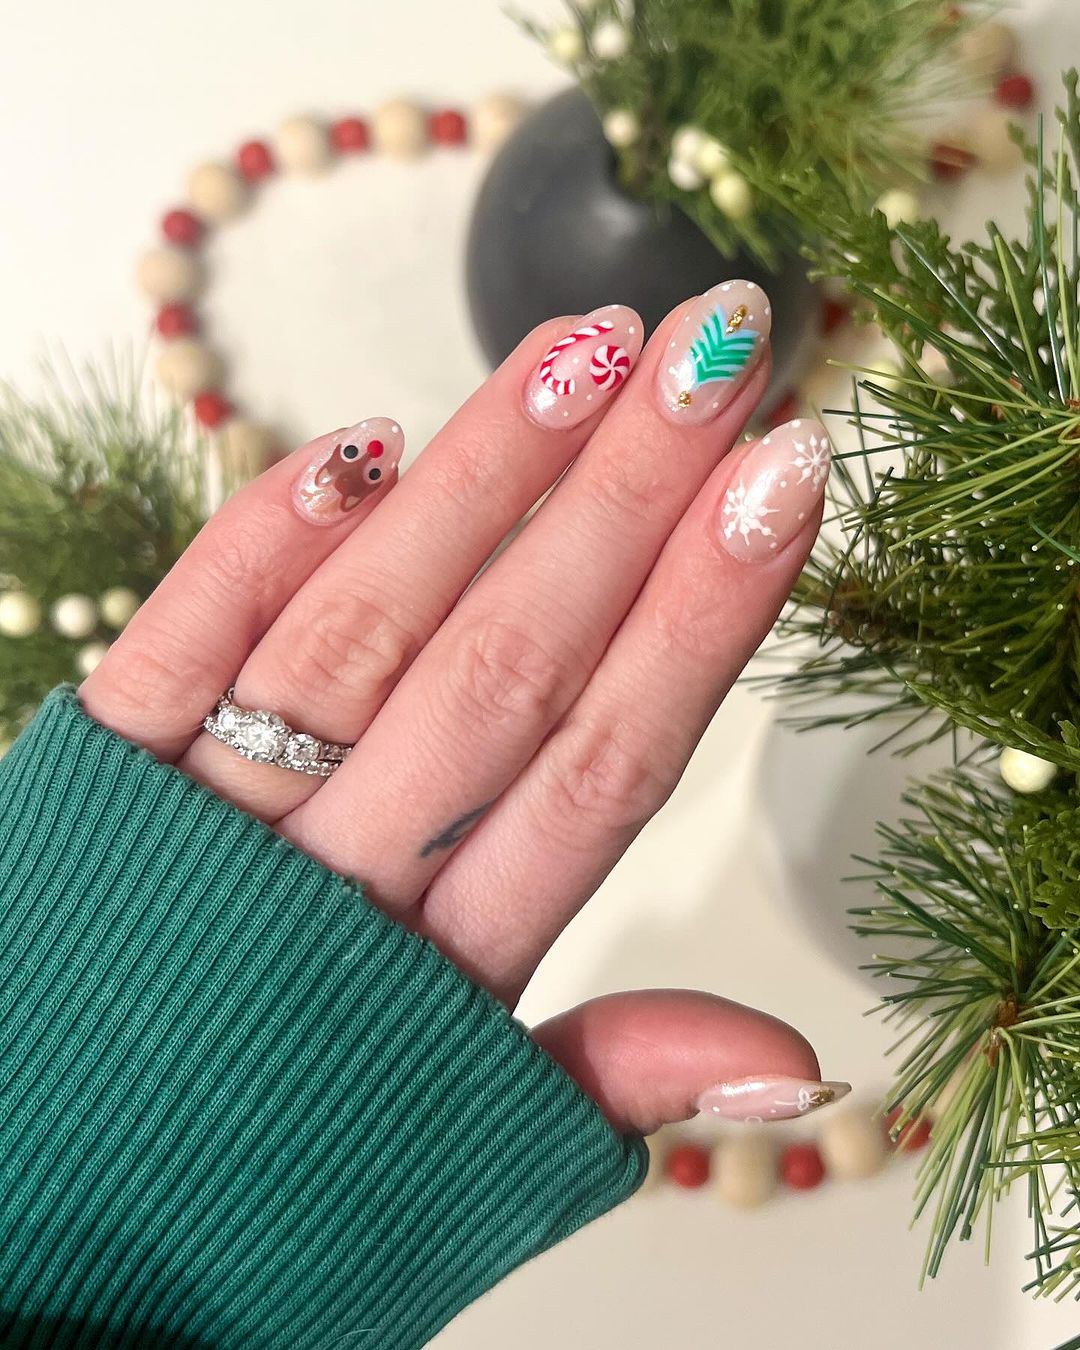
Festive Holiday Icons Nail Art
These nails are a fun take on holiday-themed nail art with cute, detailed designs like a gingerbread man, candy cane, and Christmas tree. The short length keeps it trendy and playful, and the designs are both whimsical and simple enough for someone who loves creative manicures. The use of sheer polish as a base makes the detailed art pop, while the round or oval shape adds a natural softness to the overall look.

Consumables for this look:
-
- Sheer nude base polish (Essie “Ballet Slippers”)
- Christmas-themed nail stickers (Makartt Christmas Nail Stickers)
- Fine nail art brushes for hand-painted details
How to create this look at home:
-
- Apply a sheer nude base coat for a soft, clean canvas.
- Use Christmas-themed nail stickers or carefully paint each festive icon with a fine nail art brush.
- Seal with a high-shine top coat to ensure longevity and prevent chipping.
Glittery Black French Tips with Snowflake Accents
This nail design takes a classy French tip and adds a wintery twist with glittery black tips and delicate snowflake accents. The round acrylic nails offer both durability and style, while the glitter and snowflake art make this design perfect for festive events. The combination of glitter and black polish adds depth, making the nails look trendy yet timeless.

Consumables for this look:
-
- Black glitter polish (China Glaze “Glitter Goblin”)
- White nail art pen (OPI Nail Art Pen)
- Snowflake nail decals (Essie Nail Stickers)
- Clear top coat (Sally Hansen Hard As Nails Top Coat)
How to create this look at home:
-
- Shape the nails into a round acrylic style and apply a clear base coat.
- Use black glitter polish for the French tips, ensuring they are even and symmetrical.
- Add snowflake decals to one or two nails for an extra festive touch.
- Finish with a clear top coat to lock in the glitter and snowflake design.
Burgundy and Plaid Combo Nails
This short winter nails design blends deep burgundy and navy plaid patterns for a bold yet classy winter look. The rich colors paired with plaid detailing create a cozy vibe perfect for winter outings. The combination of trendy burgundy and pretty plaid adds dimension to this otherwise simple design. The almond shape gives the nails an elongated appearance, while the plaid pattern keeps them chic and fun.

Consumables for this look:
-
- Burgundy polish (Essie “Bahama Mama”)
- Plaid nail striping tape (Makartt Nail Art Striping Tape)
- Navy polish (OPI Nail Lacquer “Russian Navy”)
- Top coat (Essie Gel Couture Top Coat)
How to create this look at home:
-
- Shape nails into a soft almond style and apply two coats of burgundy polish to the majority of the nails.
- Use striping tape to create plaid patterns on an accent nail, filling in the spaces with navy polish.
- Remove the tape and finish the look with a top coat for a smooth and glossy finish.
Glitter Ombre with Snowflake Accents
This look combines the magic of winter with delicate almond-shaped nails that feature a glitter ombre and snowflake accents. The mix of neutral tones and trendy glitter makes these nails versatile for both everyday wear and special occasions. The glitter fades from the tips down, creating a soft, dreamy effect, while the snowflake art keeps the look pretty and festive.

Consumables for this look:
-
- Nude base polish (OPI Nail Lacquer “Be There in a Prosecco”)
- Glitter polish (China Glaze “Fairy Dust”)
- Snowflake decals (Makartt Nail Stickers)
- Top coat (Seche Vite Dry Fast Top Coat)
How to create this look at home:
-
- File nails into an almond shape and apply a nude base polish.
- Use a sponge to apply the glitter ombre effect, concentrating more glitter at the tips and fading as you go down.
- Add snowflake decals to one or two nails for a wintery touch.
- Seal the look with a high-shine top coat to ensure the glitter stays intact.
Sky Blue Matte and Glossy Glitter Combo
This wintery almond-shaped nail design uses a soft sky-blue shade paired with a glittery matte finish. The combination of matte and glitter offers an unexpected contrast that adds depth and trendy elegance to this short winter nails look. The simplicity of the design, paired with a frosty feel, makes it perfect for everyday winter wear or special events.

Consumables for this look:
-
- Sky-blue nail polish (OPI Nail Lacquer “Gelato on My Mind”)
- Fine blue glitter (China Glaze “Fairy Dust”)
- Matte top coat (OPI Matte Top Coat)
- High-shine top coat (Seche Vite Top Coat)
How to create this look at home:
-
- Shape your nails into an almond form.
- Apply a sky-blue polish as your base on all nails.
- For the accent nails, dip a sponge in blue glitter and dab on until the surface is fully covered.
- Use a matte top coat for a few nails and a high-gloss top coat on others for a contrasting finish.
Sparkling French Tips with 3D Snowflake Accents
This square acrylic design mixes classy elements with a festive twist. The French tips are adorned with sparkling glitter, and one accent nail showcases a knitted 3D texture. The rhinestones add a touch of glamour, while snowflake accents make the design perfect for winter.

Consumables for this look:
-
- Nude base polish (Essie “Ballet Slippers”)
- White 3D gel (Makartt 3D Nail Gel)
- Snowflake nail decals (Born Pretty Snowflake Stamps)
- Glitter (OPI Nail Lacquer “Snow Glad I Met You”)
How to create this look at home:
-
- File your nails into a square acrylic shape and apply a nude base polish.
- Use white gel for the French tips, and layer glitter over them for a frosty, festive effect.
- Create a 3D knitted design on one accent nail with a specialized gel.
- Finish with a high-shine top coat and rhinestone accents for a touch of sparkle.
Burgundy and Star Accent Nails
Rich burgundy hues meet delicate star accents in this almond-shaped nail design. The combination of glossy burgundy and trendy gold stars creates a bold yet pretty winter look. This is a perfect design for those who love to add a little sparkle to their nails without going over the top.

Consumables for this look:
-
- Burgundy nail polish (OPI Nail Lacquer “Malaga Wine”)
- Gold star stickers (Makartt Nail Stickers – Stars)
- High-shine top coat (CND Vinylux Weekly Top Coat)
How to create this look at home:
-
- Shape your nails into a soft almond style.
- Apply two coats of burgundy polish to most of the nails.
- On the accent nails, apply star stickers over a light nude base.
- Seal with a glossy top coat to ensure the stars stay in place and add shine.
Blue Snowflake Winter Nails
This short winter nails design pairs icy blue tones with detailed snowflake art. The coffin-shaped nails are both trendy and festive, featuring a glittery accent nail and a hand-painted snowflake. The combination of different textures—glossy polish, glitter, and snowflakes—creates a dynamic wintery vibe.

Consumables for this look:
-
- Blue polish (China Glaze “Too Yacht to Handle”)
- White snowflake decals (Makartt Nail Stickers)
- Blue glitter (OPI Infinite Shine “Twilight Tones”)
- Matte top coat (Essie Matte About You)
How to create this look at home:
-
- Shape the nails into a coffin style and apply the blue polish to all but one nail.
- On the accent nail, apply a coat of glitter polish.
- Use a fine brush or snowflake decals to create the snowflake design.
- Apply a matte top coat to the snowflake nail and a glossy top coat to the rest for a contrast in textures.
Festive Reindeer and Tree Nail Art
These short winter nails are adorned with festive holiday art featuring a reindeer, snowflakes, and Christmas trees. The combination of nude and white tones gives a delicate feel, while the gold accents make the design trendy and fun for the holiday season. The round shape complements the detailed art, making it easy to wear and practical.

Consumables for this look:
-
- Nude base polish (OPI Nail Lacquer “Do You Take Lei Away”)
- White nail art brush (Makartt Nail Brushes)
- Gold foil accents (Essie “Getting Groovy”)
- Snowflake stickers or decals (Born Pretty Snowflake Nail Decals)
How to create this look at home:
-
- File nails into a round shape and apply a nude base coat.
- Use a white nail art brush or decals to create festive designs like reindeer and trees on the accent nails.
- Add gold foil for accents to elevate the design, and finish with a high-gloss top coat.
Save Pin
