
22 Gorgeous Ideas Gold Acrylic Nails: Designs in Every Color for Short & Long Nails
When it comes to nail art, gold acrylic nails are the epitome of elegance, class, and bold style. Whether you’re looking for something simple, cute, or more elaborate with rhinestones and glitter, gold acrylic nails provide endless options for creativity. How can you incorporate gold into your manicure while keeping it trendy and unique? In this article, I’ll walk you through several stunning gold acrylic nail designs, each offering a fresh take on this luxurious trend.
Classic Gold French Tips
These gold acrylic nails feature a nude base with golden French tips. The sleek and shiny finish elevates the classic look while maintaining a simple and timeless aesthetic. The gold glitter tips add a cute and fun twist that catches the light beautifully, making these nails perfect for a night out or any formal occasion.

Consumables:
- Nude base polish: Essie “Ballet Slippers” for the perfect neutral base.
- Gold glitter polish: OPI “Golden Eye” provides a rich, dazzling gold.
- Top coat: Seche Vite for a long-lasting, glossy finish.
- Nail tape or guides to create precise French tips.
DIY Instructions:
- Start by prepping your nails, filing them into a short or long shape depending on preference.
- Apply a nude base polish in 2 coats, letting each coat dry completely.
- Use nail tape or guides to mark off the tips, then carefully apply the gold glitter polish.
- Finish with a top coat for extra shine and durability.
Glittering Gold Almond Nails with Rhinestones
These long almond-shaped nails are fully coated in a vibrant gold glitter that makes a striking statement. Accented with small rhinestones on the ring finger, this design brings a glamorous yet edgy look. The use of rhinestones gives the nails added dimension and texture, making them stand out even more. Pair them with a sleek black outfit for a royal blue or green and gold color combination that feels both modern and regal.

Consumables:
- Gold glitter polish: CND “Gold Sparkle” for a rich, full-coverage glitter.
- Rhinestones: Swarovski Crystal Rhinestones for added glamour.
- Nail glue for rhinestones.
- Clear top coat: Sally Hansen “Hard as Nails” for a strong, lasting finish.
DIY Instructions:
- File your nails into an almond shape.
- Apply a clear base coat to protect the nail.
- Use 2-3 coats of gold glitter polish for full opacity.
- Add rhinestones to the ring finger, securing them with nail glue.
- Seal the look with a durable top coat.
Intricate White and Gold Nail Design
For a more artistic approach to gold acrylic nails, this design features a blend of white and gold, with intricate lines and star motifs. The gold snake accent on the middle finger adds an edgy, mystical vibe to the overall look, while the white and gold star elements on the other nails bring a softer, celestial feel. This is an ideal design for those who want to merge elegance with a touch of playfulness.

Consumables:
- White base polish: OPI “Alpine Snow” for a crisp, clean base.
- Gold nail tape for creating sharp, clean lines.
- Nail art brushes for detailing.
- Gold snake stickers or decals for the accent nail.
- Clear top coat for sealing.
DIY Instructions:
- Prep the nails and apply a white base coat on all nails.
- Use gold nail tape to create the desired line designs.
- Add gold stickers or decals, like a snake, to the middle finger for a unique look.
- Top it all off with a clear top coat to protect the design.
Minimalistic Gold Tips with Nude Base
This minimalist take on gold acrylic nails pairs a clear and nude base with bold, metallic gold tips. The design is sleek, modern, and versatile enough to wear for any occasion. The sharp contrast between the nude base and the metallic gold tips creates a chic, futuristic look while maintaining a sophisticated, simple elegance.

Consumables:
- Clear base coat: Orly “Bonder” to create a smooth base.
- Nude polish: Zoya “Laurie” for a barely-there tint.
- Gold polish: Essie “Good as Gold” for the metallic tips.
- Thin nail art brush for precise application.
DIY Instructions:
- Shape the nails into an almond or oval shape.
- Apply a clear or nude base coat to all nails.
- Using a thin nail art brush, apply gold polish to the tips.
- Seal the design with a high-gloss top coat.
Fun Tropical Gold and Nude Nails with 3D Accents
For a playful, beachy vibe, these gold acrylic nails incorporate fun, tropical-themed 3D accents like palm trees and starfish. The gold details on a neutral nude and pink base keep the design fresh and summery. The 3D elements add a fun, cute touch to the design, making it perfect for a tropical vacation or to bring some summer vibes into everyday life.

Consumables:
- Nude base polish: Sally Hansen “Bare It All” for a subtle, neutral base.
- Gold 3D accents: Palm tree and starfish embellishments.
- Gold glitter polish for additional sparkle.
- Clear top coat for durability.
DIY Instructions:
- Apply a nude base coat and allow it to dry.
- Place 3D accents on select nails, securing them with nail glue.
- Add extra gold glitter to the accents for a cohesive look.
- Apply a top coat to seal everything in place.
Gold Accented French Almond Nails
This elegant gold acrylic nails design takes a minimalistic approach with soft nude almond-shaped nails and a gold accent at the cuticle. The subtle use of gold glitter in a curved shape near the cuticle adds a delicate touch of luxury to these simple yet sophisticated nails. The clear transition from nude to gold keeps the design clean, making it ideal for both formal occasions and daily wear.

Consumables:
- Nude base polish: Essie “Mademoiselle” for a soft, neutral base.
- Gold glitter polish: Zoya “Astrid” for the accent near the cuticle.
- Fine nail art brush for precise detailing.
- Clear top coat for protection and shine.
DIY Instructions:
- Start by shaping your nails into an almond form.
- Apply a nude base coat to create a clean canvas.
- Use a fine nail art brush to apply a curved line of gold glitter at the base of the nails.
- Seal the design with a clear top coat for durability.
Black and Green Ombre Nails with Gold Glitter
These gold acrylic nails blend deep green and black in an ombre effect, complemented by striking gold glitter accents on the middle and ring fingers. The black and green ombre creates a rich and mysterious backdrop, while the gold glitter provides a pop of boldness. The rhinestones on one nail elevate the design, adding extra sparkle and a sense of opulence.

Consumables:
- Black base polish: OPI “Black Onyx” for the ombre.
- Green polish: CND “Emerald Lights” for the gradient.
- Gold glitter polish: China Glaze “Counting Carats” for accent nails.
- Rhinestones: Swarovski Crystal Rhinestones for extra embellishment.
DIY Instructions:
- Begin by applying a black base coat to your nails.
- Create the ombre effect by blending the green polish into the black with a sponge.
- Apply gold glitter to the middle and ring fingers for a contrast.
- Add rhinestones to the ring finger for an added touch of luxury.
- Seal with a clear top coat.
Brown and Gold Marble Acrylic Nails
These brown and gold acrylic nails feature a beautiful blend of chocolate brown and nude with gold glitter accents. The swirl of gold on the pinky and ring fingers creates a stunning marble effect, adding dimension and complexity to the design. The overall look is both cute and chic, perfect for autumn or winter outfits.

Consumables:
- Brown base polish: Essie “Fierce, No Fear” for the main color.
- Nude polish: OPI “Be There in a Prosecco” for the marble effect.
- Gold glitter polish: Sally Hansen “Golden-I” for the accents.
- Thin brush for marble detailing.
- Top coat for a glossy finish.
DIY Instructions:
- Apply a brown base coat to your nails.
- Use a thin brush to create marble-like swirls with the nude polish on the pinky and ring fingers.
- Add gold glitter accents to complete the marble design.
- Apply a glossy top coat for a sleek, finished look.
Gold Swirls on Pink Acrylic Nails
This gold acrylic nails design takes a softer, more playful approach with delicate gold swirls against a pink background. The fluid gold swirls create a flowing, artistic look that brings a sense of movement to the nails. The pink and gold combination is both fresh and elegant, ideal for someone looking for a fun yet polished look.

Consumables:
- Pink base polish: Zoya “Dot” for a soft pink background.
- Gold polish: OPI “Glitzerland” for the swirling accents.
- Fine nail art brush for precision.
- Clear top coat for protection.
DIY Instructions:
- Start with a soft pink base coat.
- Use a fine nail art brush to create swirling lines with the gold polish.
- Apply a clear top coat to seal and protect the design.
Gold and Green Floral Accent Nails
This intricate design showcases a beautiful combination of gold detailing and green and beige base colors. The floral motifs, highlighted by gold accents, and pearls give the nails an opulent, almost regal feel. The combination of gold foil, rhinestones, and pearls on different nails makes this look stand out for a special event or celebration.

Consumables:
- Beige base polish: Essie “Urban Jungle” for the neutral foundation.
- Green polish: CND “Sage Scarf” for accent nails.
- Gold foil for intricate detailing.
- Pearls and rhinestones for embellishment.
- Clear top coat to finish.
DIY Instructions:
- Apply a beige base polish to the nails.
- Use green polish as an accent color on select nails.
- Add gold foil detailing and secure pearls and rhinestones with nail glue.
- Seal with a top coat for a glossy, durable finish.
Gold and White Abstract Swirls
This design is perfect for those who love artistic, gold acrylic nails with a modern twist. The white and gold swirls over a nude base create a marble effect that is both elegant and bold. The contrast between the gold and white lines adds depth, making this design stand out while still being simple and wearable for both casual and formal occasions.

Consumables:
- Nude base polish: Essie “Topless & Barefoot” for a neutral backdrop.
- White polish: OPI “Alpine Snow” for the bold white swirls.
- Gold foil: OPI “Gold Foil” for delicate gold lines.
- Fine nail art brush for detailing.
- Clear top coat for a shiny, long-lasting finish.
DIY Instructions:
- Start with a nude base coat and let it dry.
- Use a fine nail art brush to create white swirls on all nails.
- Add gold foil accents along the white swirls for contrast.
- Finish with a clear top coat for protection.
Lilac and Gold Flower Accent
For a softer, more playful take on gold acrylic nails, this design uses lilac as a base with delicate gold accents and a 3D flower. The combination of purple and gold is both feminine and luxurious, while the flower brings a touch of nature to the design. The gold stars and lines provide just enough shimmer to make this manicure perfect for special occasions.

Consumables:
- Lilac polish: Essie “Lilacism” for the base color.
- Gold foil for accents and stars.
- 3D floral decoration.
- Clear top coat for sealing and adding shine.
DIY Instructions:
- Apply the lilac base coat.
- Add the 3D flower to one nail for a statement look.
- Use gold foil to add accents, such as stars and lines, to complement the flower.
- Apply a clear top coat for durability.
Chunky Gold Glitter Tips
These gold acrylic nails take the classic French tip design and give it a glamorous update with chunky gold glitter. The clear and nude base makes the gold glitter tips pop, giving a luxurious and eye-catching appearance. This design is perfect for those who want to keep it simple but still love a bit of sparkle.

Consumables:
- Clear base polish: Orly “Bonder” for a smooth finish.
- Chunky gold glitter polish: China Glaze “Golden Enchantment” for the tips.
- Clear top coat for sealing the glitter.
DIY Instructions:
- Apply a clear base coat.
- Add chunky gold glitter to the tips for a bold look.
- Seal with a top coat for a smooth and glossy finish.
Gold Leaf Tips on Nude Base
This elegant gold acrylic nails design uses thin gold leaf accents at the tips to create a natural, leaf-like pattern. The nude base contrasts beautifully with the shiny gold details, making the design look sophisticated yet playful. This cute and delicate look is perfect for those who prefer something more understated yet still fashionable.

Consumables:
- Nude base polish: Zoya “Rue” for a neutral base.
- Gold leaf for the accents.
- Nail art brush for precise application.
- Clear top coat for shine.
DIY Instructions:
- Apply the nude base coat.
- Use a nail art brush to place the gold leaf on the tips in a leaf-like pattern.
- Seal with a top coat to protect the design.
Sculpted Gold 3D Nails
These long sculpted gold acrylic nails feature a textured 3D effect, giving them a luxurious and unique look. The bold gold finish and intricate swirling pattern elevate this design to a whole new level, making it a standout choice for events where you want your nails to steal the show. The gold is so bold that no additional colors or accents are needed.

Consumables:
- Gold gel polish: Madam Glam “Gold Gel” for the base and 3D swirls.
- Nail sculpting tools for creating texture.
- UV lamp for curing gel polish.
DIY Instructions:
- Apply the gold gel polish to your nails.
- Use sculpting tools to create 3D swirls on the nails.
- Cure the design under a UV lamp and finish with a clear top coat for shine and durability.
Gold Glitter and Leopard Accent Nails
This design combines gold acrylic nails with a playful leopard print accent, adding a bold yet chic flair. The gold glitter on the thumb and the animal print on the ring finger create a striking contrast, making the nails pop without overwhelming the overall look. This manicure is ideal for those who want to experiment with patterns while keeping things cute and trendy.

Consumables:
- Nude base polish: Essie “Ballet Slippers” for the background.
- Gold glitter polish: OPI “All Sparkly and Gold” for the thumb.
- Black polish: OPI “Black Onyx” for the leopard spots.
- Clear top coat to lock everything in.
DIY Instructions:
- Start with a nude base coat on all nails.
- Apply gold glitter on the thumb and add the leopard print pattern on the ring finger using a dotting tool and black polish.
- Finish with a top coat to seal the design.
Gold Foil French Tips
These gold acrylic nails give a fresh take on the classic French tip by using metallic gold foil instead of the traditional white. The clear and nude base makes the sharp gold tips stand out, creating a modern, sophisticated look. This minimalist yet elegant design works well for both casual and formal settings.

Consumables:
- Clear base polish: Orly “Bonder” for the foundation.
- Gold foil for the tips.
- Clear top coat for extra shine and protection.
DIY Instructions:
- Apply a clear base coat to all nails.
- Carefully place gold foil on the tips for a sharp, modern French tip effect.
- Seal the look with a clear top coat for durability.
White and Gold Swirl Nails
This stiletto-shaped design features flowing white and gold swirls over a clear base, creating a fluid, ethereal look. The mix of gold glitter and white polish forms an eye-catching pattern that’s ideal for special events or when you want to elevate your everyday style. The overall effect is both elegant and simple, with the glitter adding just the right amount of glamour.

Consumables:
- Clear base polish: OPI “Clear Gloss” for a smooth finish.
- White polish: OPI “Alpine Snow” for the swirl details.
- Gold glitter polish: Essie “Rock at the Top” for accents.
- Fine nail art brush for precision.
DIY Instructions:
- Apply a clear base coat to the nails.
- Use a fine brush to create white and gold swirls on each nail.
- Apply a clear top coat for long-lasting protection and shine.
Gold and Black Abstract Print Nails
This bold design incorporates black abstract patterns and gold foil accents, resulting in a striking black and gold combo. The soft nude base keeps the design grounded, while the random placement of gold foil adds an edgy, artistic touch. Perfect for those looking to combine simple and daring elements in their nail art.

Consumables:
- Nude base polish: Zoya “Nude” for a neutral backdrop.
- Black polish: Sally Hansen “Blacky O” for abstract shapes.
- Gold foil for accents.
- Clear top coat for finishing.
DIY Instructions:
- Start with a nude base on all nails.
- Apply abstract black shapes randomly across the nails.
- Add gold foil accents for contrast, then seal with a top coat.
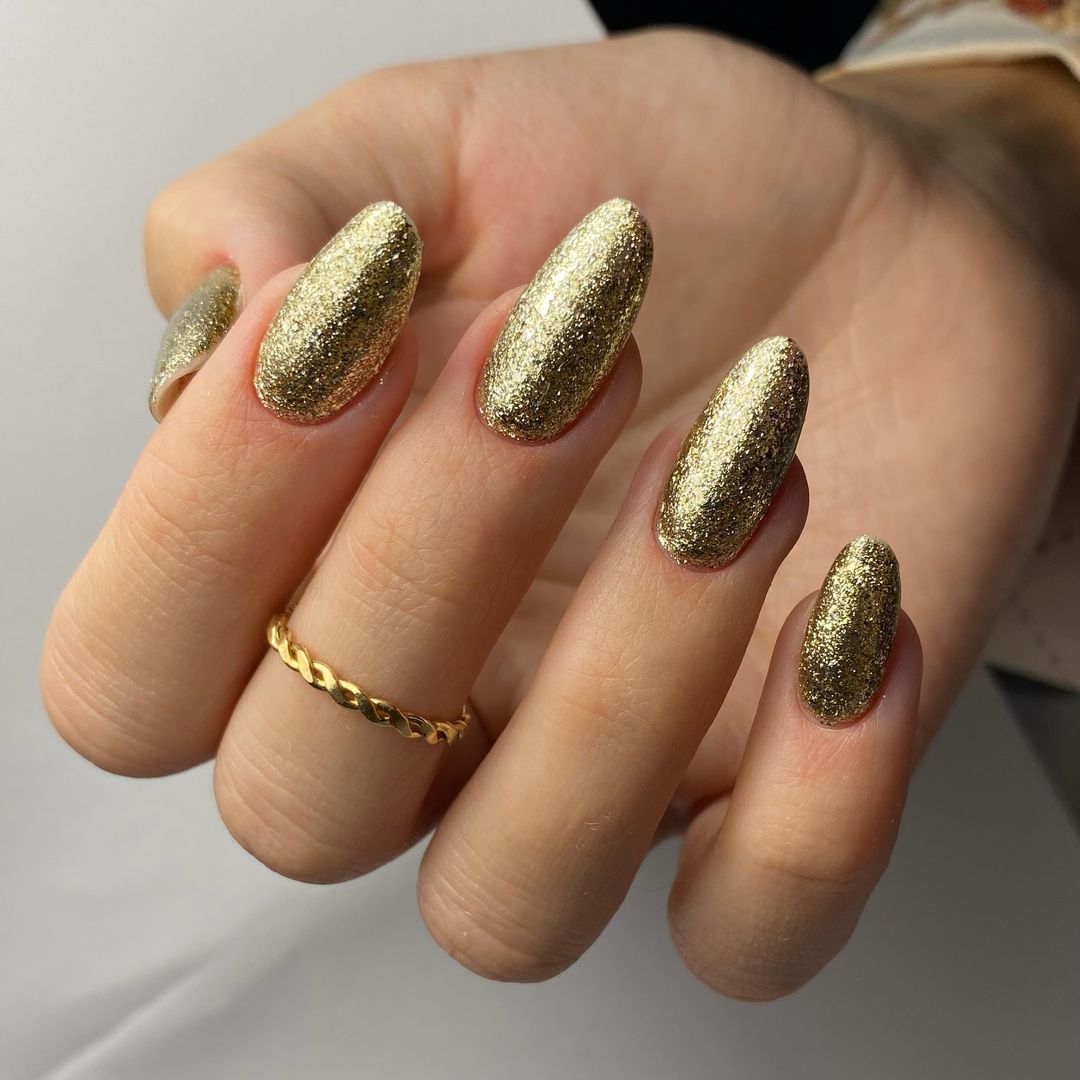
Full Gold Glitter Oval Nails
These gold acrylic nails are all about maximalism, with every nail coated in a dazzling gold glitter polish. The long oval shape enhances the shine, making this manicure ideal for occasions where you want your nails to be the center of attention. The simplicity of the single color adds a luxurious vibe, especially under bright lights.

Consumables:
- Gold glitter polish: China Glaze “Golden Enchantment” for the main coat.
- Clear top coat for extra gloss and protection.
DIY Instructions:
- Apply a base coat to protect the nails.
- Coat all nails with two layers of gold glitter polish.
- Finish with a clear top coat to ensure durability and maximum shine.
Nude and Gold V-Tip Acrylic Nails
This elegant design uses a sharp gold V-tip accent on a nude base, giving the nails a chic and sophisticated feel. The pointed stiletto shape combined with the metallic gold tip adds a bold, glamorous touch, while the clear and nude base keeps the look refined. It’s perfect for those who want to make a statement without overwhelming their style.

Consumables:
- Nude base polish: Essie “Mademoiselle” for the background.
- Gold foil for the V-tip design.
- Clear top coat for a glossy finish.
DIY Instructions:
- Apply a nude base coat to all nails.
- Use gold foil to create a V-tip shape on each nail.
- Seal the design with a clear top coat for a sleek finish.
Gold Foil and White French Tip with Bow Accent
This gold acrylic nails design takes French tips to the next level with the addition of gold foil and delicate white detailing. One nail features a cute bow accent, adding a cute and playful twist to the otherwise elegant look. The combination of white and gold creates a sophisticated contrast that works beautifully for formal events or a fun, polished everyday look.

Consumables:
- Nude base polish: Zoya “Chantal” for the background.
- Gold foil for the French tips.
- White polish: Essie “Blanc” for detailing.
- 3D bow decoration for the accent.
- Clear top coat for protection.
DIY Instructions:
- Start with a nude base coat.
- Apply gold foil to create French tips, adding white detailing for contrast.
- Attach a 3D bow on the accent nail using nail glue.
- Finish with a top coat to secure the look.
Save Pin
