
Summer 2024 is set to be a season of vibrant and classy nail designs. Whether you’re looking for simple elegance or bold statements, there’s a trend for every style. Let’s explore some of the most stunning and classy summer nail ideas for 2024.
Radiant Sunrise Nails
Radiant sunrise nails are a stunning option for those who love a blend of warm colors. This design features a beautiful gradient of pink, orange, and yellow hues, creating a mesmerizing sunrise effect on your nails. The glossy finish adds a touch of sophistication, making these nails perfect for summer events and beach outings.

Consumables:
- Gradient nail polish set (pink, orange, yellow)
- Glossy top coat
- Nail sponge
- Fine detail brush
Recommendations:
- Opt for OPI’s gradient polish set for vibrant colors.
- Use Seche Vite top coat for a long-lasting glossy finish.
- A fine detail brush from Pueen can help create smooth transitions.
DIY Instructions:
- Start with a clear base coat to protect your nails.
- Use a sponge to apply the gradient colors, starting with yellow at the base, blending into orange, and finishing with pink at the tips.
- Clean up any excess polish around the nails with a detail brush dipped in nail polish remover.
- Finish with a glossy top coat to seal the design and add shine.
Bold Animal Print Nails
Animal prints are making a strong comeback in 2024, and this bold design is no exception. Featuring a mix of zebra and leopard prints with a striking red accent, these nails are sure to turn heads. The matte finish adds a modern twist to the classic animal print look.

Consumables:
- Zebra print nail stickers
- Leopard print nail stickers
- Matte red nail polish
- Matte top coat
Recommendations:
- Try Sally Hansen’s nail stickers for easy application.
- Use Essie’s matte red polish for a vivid color.
- Apply OPI’s matte top coat for a smooth finish.
DIY Instructions:
- Apply a base coat to protect your nails.
- Stick the zebra and leopard print stickers on alternate nails.
- Paint the remaining nails with matte red polish.
- Apply a matte top coat over all nails to ensure uniformity and durability.
Floral Fantasy Nails
Floral designs are timeless, and these red and purple flowers on a nude base are perfect for a classy summer look. The semi-transparent nude base gives the nails a delicate appearance, while the bright floral accents add a playful touch.

Consumables:
- Nude base polish
- Red and purple nail art pens
- Clear top coat
Recommendations:
- Essie’s nude base polish offers excellent coverage.
- Use Modelones nail art pens for precise flower designs.
- Finish with a Sally Hansen clear top coat for protection.
DIY Instructions:
- Start with a nude base coat on all nails.
- Use nail art pens to draw small red and purple flowers on each nail.
- Add tiny white dots in the center of each flower for extra detail.
- Seal the design with a clear top coat.
Speckled Pastel Nails
For a fun and quirky summer look, speckled pastel nails are a great choice. Each nail features a different pastel color with black speckles, creating a playful yet sophisticated design. This style is perfect for those who love to experiment with colors.

Consumables:
- Pastel nail polish set (pink, blue, green)
- Black speckle top coat
Recommendations:
- Zoya’s pastel polish set provides a range of beautiful colors.
- Use China Glaze’s black speckle top coat for the perfect finish.
DIY Instructions:
- Apply a pastel color on each nail, choosing different shades for variety.
- Wait for the base colors to dry completely.
- Apply the black speckle top coat over each nail.
- Finish with a clear top coat to protect the design.
Marble Elegance Nails
Marble nails are the epitome of elegance, and this design featuring white and gold accents is perfect for a classy summer look. The subtle marble effect combined with gold flecks creates a luxurious appearance that is sure to impress.

Consumables:
- White marble nail polish
- Gold foil flakes
- Clear top coat
Recommendations:
- Use Kiara Sky’s marble polish for an authentic look.
- Gold foil flakes from Born Pretty add a touch of luxury.
- Apply Seche Vite clear top coat for a long-lasting finish.
DIY Instructions:
- Apply a white marble polish as the base.
- While the polish is still wet, place gold foil flakes on the nails using tweezers.
- Press the flakes gently to ensure they stick to the polish.
- Finish with a clear top coat to seal the design and add shine.
Neon Zebra Nails
Neon zebra nails are all about boldness and vibrant colors. This design combines neon green and yellow with a striking zebra print accent, creating a lively and eye-catching look. The high gloss finish adds a polished touch, making these nails perfect for summer parties and festivals.

Consumables:
- Neon green nail polish
- Neon yellow nail polish
- Black nail art pen or polish
- Glossy top coat
Recommendations:
- Use China Glaze’s neon collection for vibrant colors.
- For precise zebra stripes, try the Sally Hansen nail art pen.
- Seche Vite’s top coat will ensure a glossy and durable finish.
DIY Instructions:
- Apply a clear base coat to protect your nails.
- Paint alternate nails with neon green and yellow polish.
- Use a black nail art pen to draw zebra stripes on one or two accent nails.
- Seal the design with a glossy top coat.
Blue Abstract Waves
Blue abstract waves are a dreamy and artistic choice for summer nails. This design features soft blue and white waves that create a serene and calming effect. The glossy finish enhances the fluidity of the design, making it ideal for beach vacations and summer getaways.

Consumables:
- Light blue nail polish
- White nail polish
- Fine detail brush
- Glossy top coat
Recommendations:
- Essie’s light blue polish provides a perfect base.
- Use OPI’s white polish for the wave accents.
- A fine detail brush from Pueen will help create smooth, flowing lines.
DIY Instructions:
- Start with a clear base coat.
- Paint all nails with light blue polish.
- Use a fine detail brush to draw abstract white waves on each nail.
- Finish with a glossy top coat to enhance the design.
Metallic Chrome Flames
Metallic chrome flames are a futuristic and edgy nail design that stands out. This look features sleek chrome nails with black flame accents, creating a dynamic and bold effect. The reflective chrome finish is perfect for making a statement this summer.

Consumables:
- Chrome nail polish
- Black nail art pen or polish
- Chrome powder
- Clear top coat
Recommendations:
- Use Born Pretty’s chrome polish for a reflective finish.
- The Sally Hansen nail art pen is great for precise flame designs.
- Finish with OPI’s clear top coat for extra shine.
DIY Instructions:
- Apply a clear base coat.
- Paint all nails with chrome polish.
- Use a black nail art pen to draw flame designs on each nail.
- Seal the design with a clear top coat.
Neon French Tips
Neon French tips are a modern twist on the classic French manicure. This design features bright neon tips on a nude base, creating a vibrant and playful look. The combination of neon colors adds a fun and trendy vibe, perfect for summer.

Consumables:
- Nude base polish
- Neon nail polish set (multiple colors)
- Fine detail brush
- Clear top coat
Recommendations:
- Essie’s nude base polish provides a smooth canvas.
- Use Modelones neon polish set for a variety of bright colors.
- A fine detail brush from Pueen will help create clean tips.
DIY Instructions:
- Apply a nude base coat.
- Use a fine detail brush to paint neon tips in different colors on each nail.
- Finish with a clear top coat to protect the design.
Coral Gradient Nails
Coral gradient nails are a chic and elegant choice for summer. This design features a smooth gradient from coral to nude, with delicate white floral accents. The glossy finish adds a touch of sophistication, making these nails perfect for any summer occasion.

Consumables:
- Coral nail polish
- Nude nail polish
- White nail art pen or polish
- Glossy top coat
Recommendations:
- OPI’s coral polish offers a vibrant shade.
- Use Essie’s nude polish for the gradient base.
- A white nail art pen from Sally Hansen is perfect for creating floral designs.
DIY Instructions:
- Apply a nude base coat.
- Use a sponge to create a coral gradient on each nail.
- Draw delicate white floral designs on the tips using a nail art pen.
- Seal the design with a glossy top coat.
Pastel Delight Nails
Pastel delight nails are a whimsical and fun choice for summer. This design features a mix of pastel colors with playful geometric patterns and dot accents. The combination of colors and shapes creates a vibrant and lively look that is perfect for summer festivities.

Consumables:
- Pastel nail polish set (yellow, pink, green, purple)
- White nail art pen
- Dotting tool
- Clear top coat
Recommendations:
- Try Zoya’s pastel polish set for a variety of soft colors.
- Use the Sally Hansen white nail art pen for detailed designs.
- A dotting tool from Pueen will help create perfect dots.
DIY Instructions:
- Apply a clear base coat.
- Paint each nail with a different pastel color.
- Use a white nail art pen to draw geometric patterns and dots.
- Seal the design with a clear top coat.
Oceanic Blue Nails
Oceanic blue nails capture the essence of summer with their vibrant blue hues and glitter accents. This design features a combination of solid blue, glitter blue, and abstract wave patterns, creating a refreshing and stylish look perfect for beach days and summer outings.

Consumables:
- Blue nail polish
- Glitter blue polish
- White nail art pen
- Clear top coat
Recommendations:
- Essie’s blue polish offers a bright and vibrant color.
- Use China Glaze’s glitter blue polish for sparkle.
- The Sally Hansen nail art pen is great for creating wave patterns.
DIY Instructions:
- Apply a clear base coat.
- Paint alternate nails with solid blue and glitter blue polish.
- Use a white nail art pen to draw wave patterns on the solid blue nails.
- Finish with a clear top coat to protect the design.
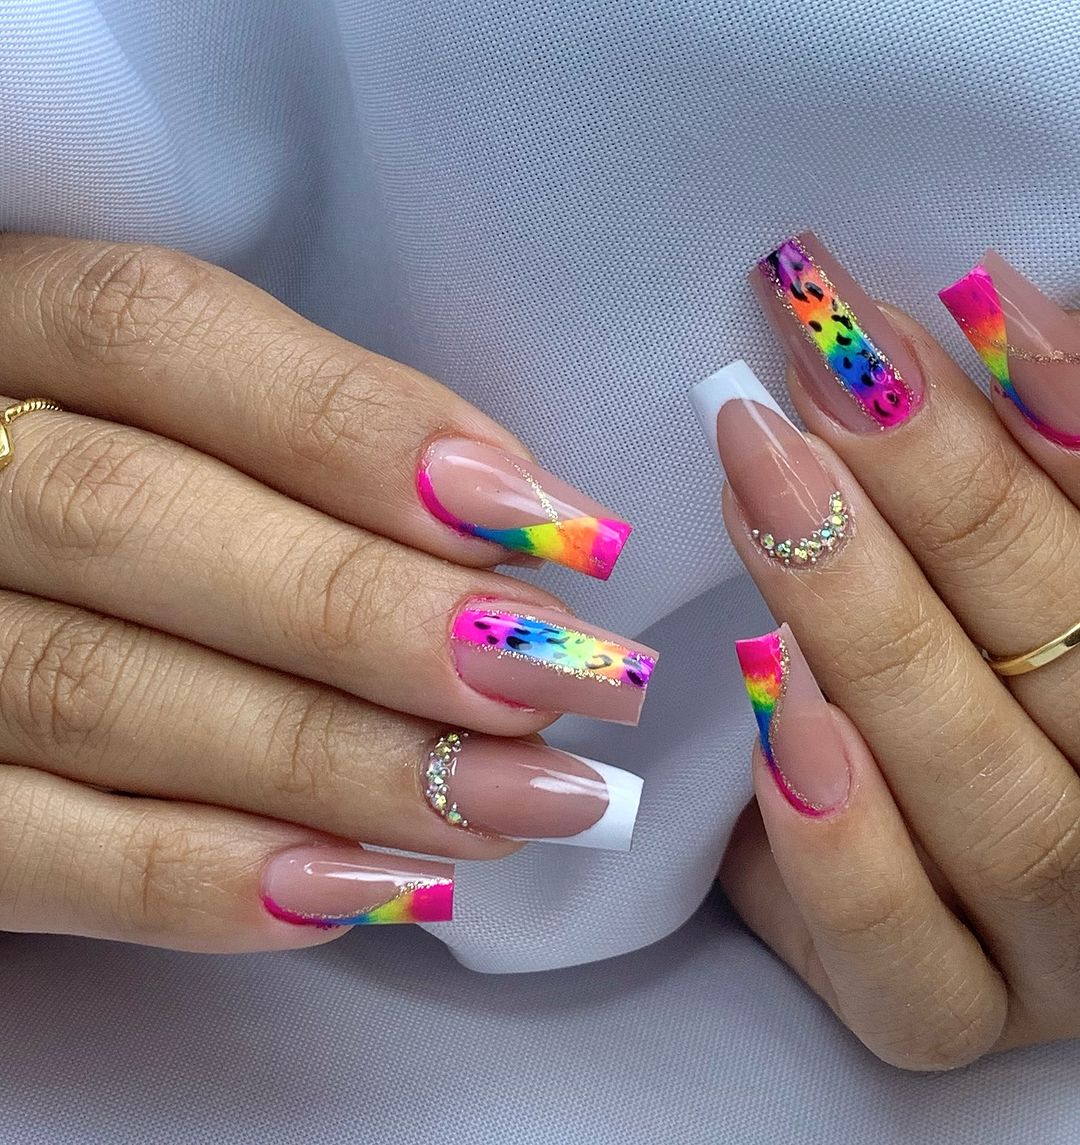
Rainbow French Tips
Rainbow French tips are a colorful and trendy take on the classic French manicure. This design features vibrant rainbow colors on the tips, with some nails adorned with glitter and rhinestones for added sparkle. It’s a fun and eye-catching look perfect for summer celebrations.

Consumables:
- Nude base polish
- Neon nail polish set (multiple colors)
- Glitter polish
- Rhinestones
- Clear top coat
Recommendations:
- Use Essie’s nude polish for a smooth base.
- Modelones neon polish set provides a variety of bright colors.
- Try Born Pretty’s glitter polish for extra sparkle.
- Rhinestones from Sally Hansen add a touch of glamour.
DIY Instructions:
- Apply a nude base coat.
- Use different neon colors to paint the tips in a rainbow pattern.
- Add glitter polish to some tips for extra shine.
- Apply rhinestones to accent nails using a dotting tool.
- Seal the design with a clear top coat.
Sunset Ombre Nails
Sunset ombre nails bring the beauty of a summer sunset to your fingertips. This design features a gradient from bright yellow to orange, creating a warm and inviting look. The glossy finish adds a sleek touch, making these nails perfect for summer evenings.

Consumables:
- Yellow nail polish
- Orange nail polish
- Makeup sponge
- Clear top coat
Recommendations:
- OPI’s yellow and orange polishes provide vibrant colors.
- A makeup sponge from Real Techniques helps create a smooth gradient.
- Use Seche Vite clear top coat for a glossy finish.
DIY Instructions:
- Apply a clear base coat.
- Use a makeup sponge to apply yellow at the base, blending into orange towards the tips.
- Clean up any excess polish around the nails with a detail brush dipped in nail polish remover.
- Finish with a clear top coat to seal the design.
Neon Floral Nails
Neon floral nails are a bold and playful design that combines vibrant neon colors with delicate floral patterns. This look features neon ombre nails with hand-painted flowers, creating a striking and artistic appearance perfect for summer festivals and events.

Consumables:
- Neon nail polish set (multiple colors)
- White nail art pen
- Fine detail brush
- Clear top coat
Recommendations:
- Use Modelones neon polish set for bright and bold colors.
- The Sally Hansen white nail art pen is ideal for drawing flowers.
- A fine detail brush from Pueen helps create intricate designs.
DIY Instructions:
- Apply a clear base coat.
- Use different neon colors to create an ombre effect on each nail.
- Draw delicate flowers on the nails using a white nail art pen and fine detail brush.
- Seal the design with a clear top coat.
Lavender Dreams Nails
Lavender dreams nails are the epitome of elegance and simplicity. This design features a solid lavender color with a glossy finish, creating a chic and sophisticated look. The almond shape adds a touch of femininity, making these nails perfect for any summer occasion.

Consumables:
- Lavender nail polish
- Clear base coat
- Glossy top coat
Recommendations:
- Essie’s lavender polish offers a beautiful, even coverage.
- Start with OPI’s clear base coat for durability.
- Finish with Seche Vite top coat for a high-gloss finish.
DIY Instructions:
- Apply a clear base coat to protect your nails.
- Paint all nails with lavender polish, applying two coats for opacity.
- Seal the design with a glossy top coat to enhance the color and longevity.
Playful Avocado Nails
Playful avocado nails bring a fun and quirky element to your summer look. This design features cute avocado illustrations on a soft yellow matte base, perfect for adding a playful touch to your nails. The square shape gives a modern edge to this adorable design.

Consumables:
- Yellow matte nail polish
- Green and brown nail art pens
- Clear matte top coat
Recommendations:
- Use Sally Hansen’s yellow matte polish for a smooth base.
- The Sally Hansen nail art pens in green and brown are perfect for drawing avocados.
- Apply Essie’s matte top coat for a lasting finish.
DIY Instructions:
- Apply a clear base coat.
- Paint all nails with yellow matte polish.
- Use green and brown nail art pens to draw cute avocado designs on each nail.
- Finish with a clear matte top coat to protect the design.
Farm Fresh Nails
Farm fresh nails bring a touch of nature to your manicure. This design features cow print French tips with adorable frog and cactus accents, creating a whimsical and unique look. The glossy finish ties everything together, making these nails a standout choice for summer.

Consumables:
- Nude base polish
- Black and white nail art pens
- Green nail art pen
- Clear glossy top coat
Recommendations:
- Essie’s nude base polish provides a great foundation.
- Use Sally Hansen nail art pens for precise cow prints and cactus designs.
- A clear glossy top coat from OPI ensures a polished finish.
DIY Instructions:
- Apply a nude base coat.
- Use black and white nail art pens to create cow print French tips.
- Draw frog and cactus designs on accent nails using a green nail art pen.
- Seal the design with a clear glossy top coat.
Polka Dot Delight Nails
Polka dot delight nails combine elegance with a playful twist. This design features lavender nails with intricate black and white polka dot accents on a nude base. The combination of colors and patterns creates a sophisticated yet fun look perfect for summer.

Consumables:
- Lavender nail polish
- Nude base polish
- Black and white nail art pens
- Clear top coat
Recommendations:
- Use OPI’s lavender polish for vibrant color.
- Essie’s nude base polish provides a great canvas.
- The Sally Hansen black and white nail art pens are ideal for creating polka dots.
DIY Instructions:
- Apply a clear base coat.
- Paint alternate nails with lavender polish and nude base polish.
- Use black and white nail art pens to create polka dot designs on the nude nails.
- Finish with a clear top coat to protect the design.
Sunset Stiletto Nails
Sunset stiletto nails are a bold and dramatic choice for summer. This design features a stunning gradient from turquoise to orange with a glossy finish. The sharp stiletto shape adds an edgy touch, making these nails perfect for those who love to make a statement.

Consumables:
- Turquoise nail polish
- Orange nail polish
- Makeup sponge
- Clear top coat
Recommendations:
- Use Essie’s turquoise and orange polishes for a vibrant gradient.
- A makeup sponge from Real Techniques helps blend the colors smoothly.
- Seche Vite’s clear top coat provides a long-lasting, glossy finish.
DIY Instructions:
- Apply a clear base coat.
- Use a makeup sponge to apply turquoise at the base, blending into orange towards the tips.
- Clean up any excess polish around the nails with a detail brush dipped in nail polish remover.
- Finish with a clear top coat to seal the design.
Ocean Waves and French Tips Nails
Ocean waves and French tips nails combine the serenity of the sea with the elegance of classic French tips. This design features stunning blue marble waves on two nails, accented with rhinestones, and sleek black-tipped French nails on the others. The stiletto shape adds drama and sophistication to this captivating look.

Consumables:
- Blue marble nail polish
- White nail polish
- Black nail polish
- Rhinestones
- Clear top coat
Recommendations:
- Use Born Pretty’s blue marble polish for a realistic wave effect.
- Sally Hansen’s white and black polishes are perfect for French tips.
- Apply rhinestones from Swarovski for added sparkle.
- Finish with Seche Vite clear top coat for a glossy finish.
DIY Instructions:
- Apply a clear base coat to protect your nails.
- Paint two nails with blue marble polish and the rest with white polish.
- Create black French tips on the white nails using a fine detail brush.
- Add rhinestones to the marble nails for extra embellishment.
- Seal the design with a clear top coat to enhance shine and durability.
Glitter Glam and French Ombre Nails
Glitter glam and French ombre nails offer a blend of sophistication and sparkle. This design features a dazzling glitter accent nail, French ombre nails transitioning from nude to white, and sleek white-tipped nails. The square shape adds a modern twist to this classic and glamorous look.

Consumables:
- Nude base polish
- White nail polish
- Red glitter polish
- Rhinestones
- Clear top coat
Recommendations:
- Use Essie’s nude base polish for a smooth foundation.
- OPI’s white polish provides crisp tips and ombre effects.
- Try China Glaze’s red glitter polish for a dazzling accent.
- Swarovski rhinestones add a touch of luxury.
- Finish with Seche Vite clear top coat for a long-lasting shine.
DIY Instructions:
- Apply a clear base coat to all nails.
- Paint the middle nail with red glitter polish.
- Create a French ombre effect on the ring and index nails using a sponge to blend nude and white polish.
- Paint the remaining nails with a nude base and add white tips for a French manicure look.
- Add rhinestones to the glitter nail for extra sparkle.
- Seal the design with a clear top coat to protect the manicure and enhance shine.
Save Pin
