
24 Cute and Classy Ideas Fall Nail Designs for Every Occasion and Season
As the leaves start to change and the air becomes crisp, it’s time to embrace the beauty of fall with a fresh manicure. But why stick to the usual autumn colors when you can add a touch of magic to your nails? Disney fall nails are the perfect way to combine the enchantment of Disney with the cozy vibes of autumn. In this article, we’ll explore some delightful nail designs inspired by Disney characters, fall colors, and festive themes. Whether you prefer simple or intricate designs, there’s something here for everyone.
Pluto and Paint Splashes
This playful nail design features Pluto with vibrant orange and pink paint splashes on a matte nude background. The square shape adds a modern touch to the cute and fun artwork. This design is perfect for those who love to showcase their Disney fandom in a subtle yet creative way.

Consumables:
-
- Nude matte nail polish (e.g., OPI “Matte Top Coat”)
- Orange and pink nail polishes (e.g., Essie “Meet Me at Sunset” and “Mod Square”)
- Pluto decal
- Fine nail art brush
Instructions:
-
- Apply a base coat.
- Paint the nails with nude matte polish.
- Apply the Pluto decal on the accent nail.
- Use the fine brush to create orange and pink paint splashes.
- Seal with a matte top coat for durability.
Mickey Mouse Silhouette
This classic design features Mickey Mouse silhouettes on a white and black speckled background. The almond shape gives it an elegant touch, making it a versatile look for any occasion. The simple yet iconic design is perfect for Disney fans who prefer a subtle manicure.

Consumables:
-
- White and black nail polishes (e.g., Essie “Blanc” and “Licorice”)
- Mickey Mouse silhouette decals
- Fine nail art brush
Instructions:
-
- Apply a base coat.
- Paint the nails with white polish.
- Apply Mickey Mouse silhouette decals on each nail.
- Use the fine brush to add black speckles around the silhouettes.
- Seal with a top coat for a smooth finish.
Inside Out Characters
This vibrant design features characters from Inside Out on a glittery background. The stiletto shape adds a dramatic flair, making it perfect for those who love bold and colorful nails. The detailed artwork of the characters brings the design to life, making it a fun and unique choice.

Consumables:
-
- Glitter nail polishes (e.g., OPI “I Snow You Love Me”)
- Inside Out character decals
- Fine nail art brush
Instructions:
-
- Apply a base coat.
- Paint the nails with glitter polish.
- Apply Inside Out character decals on each nail.
- Use the fine brush to add additional details.
- Seal with a top coat for durability.
Classic Disney Characters
This nostalgic design features classic Disney characters, including Donald Duck, Goofy, and Mickey Mouse, on a sparkly lavender background. The square shape and glitter accents make this design cute and eye-catching, perfect for adding a touch of Disney magic to your nails.

Consumables:
-
- Lavender glitter nail polish (e.g., Essie “A Cut Above”)
- Classic Disney character decals
- Fine nail art brush
Instructions:
-
- Apply a base coat.
- Paint the nails with lavender glitter polish.
- Apply classic Disney character decals on each nail.
- Use the fine brush to add additional details.
- Seal with a top coat for a glossy finish.
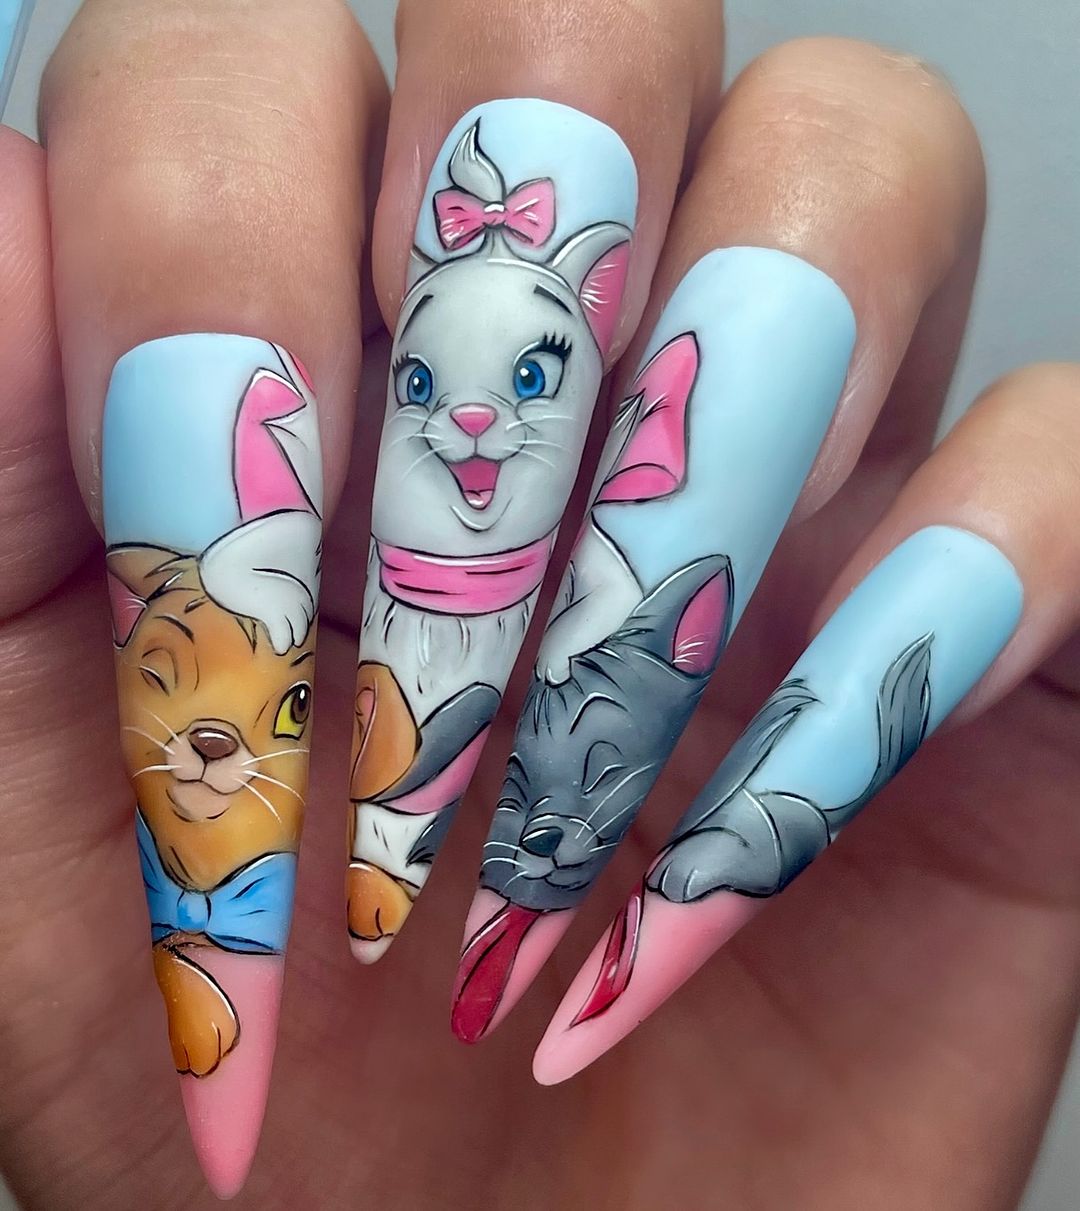
Aristocats Fun
This charming design features the adorable characters from Aristocats on a pastel blue and pink background. The stiletto shape and detailed artwork make these nails perfect for those who love cute and playful designs. The pastel colors add a touch of elegance, making it suitable for any season.

Consumables:
-
- Pastel blue and pink nail polishes (e.g., Essie “Mint Candy Apple” and “Fiji”)
- Aristocats character decals
- Fine nail art brush
Instructions:
-
- Apply a base coat.
- Paint the nails with pastel blue and pink polishes.
- Apply Aristocats character decals on each nail.
- Use the fine brush to add additional details.
- Seal with a top coat for durability.
Genie and Magic Carpet Adventure
These nails bring the magic of Aladdin to your fingertips with a vibrant and detailed design. Featuring the Genie on the middle finger, the nails are adorned with glittery blue, golden stripes, and 3D gemstones for a dazzling effect. The stiletto shape enhances the magical feel, making these nails perfect for those who love a bit of sparkle and fun.

Consumables:
-
- Nude and blue nail polishes (e.g., Essie “Sand Tropez” and “Butler Please”)
- Gold glitter polish (e.g., OPI “Glitzerland”)
- 3D gemstones and nail glue
- Genie nail decal
- Fine nail art brush
Instructions:
-
- Apply a base coat.
- Paint the nails with nude polish, leaving space for blue tips.
- Create the blue tips and add gold glitter stripes.
- Apply the Genie decal on the middle finger.
- Add 3D gemstones using nail glue.
- Finish with a top coat for a glossy finish.
Inside Out Emotions – Part 2
Continuing with the Inside Out theme, this design showcases the characters’ expressions on shorter nails. The colorful artwork brings each character to life, making it a playful and fun design perfect for any occasion. The shorter length makes this design practical and easy to maintain.

Consumables:
-
- Variety of colorful nail polishes (e.g., OPI “No Room for the Blues”, “Hot & Spicy”)
- Inside Out character decals
- Fine-tipped nail art brush
Instructions:
-
- Start with a base coat.
- Paint each nail a different color to represent the characters.
- Apply character decals on each nail.
- Use the fine-tipped brush to add details and expressions.
- Seal with a top coat to ensure durability.
Aladdin and Jasmine
This design captures the essence of Aladdin with detailed portraits of Aladdin, Jasmine, and the Genie. The gold glitter accents add a touch of royalty, making these nails perfect for a classy and magical look. The stiletto shape and intricate details make this design stand out.

Consumables:
-
- Nude, blue, and gold glitter nail polishes (e.g., Essie “Nude Beach”, “Butler Please”, “Rock at the Top”)
- Aladdin character decals
- Fine nail art brush
Instructions:
-
- Apply a base coat.
- Paint the nails with nude polish.
- Add blue tips and gold glitter accents.
- Apply Aladdin, Jasmine, and Genie decals.
- Use the fine brush to add additional details.
- Finish with a top coat for a smooth finish.
DuckTales Fun
This design features the lovable characters from DuckTales, including Scrooge McDuck and his nephews. The combination of nude and gold accents makes it perfect for fall. The square shape and detailed artwork make these nails a cute and playful option for Disney fans.

Consumables:
-
- Nude and gold nail polishes (e.g., Zoya “Chantal” and “Ziv”)
- DuckTales character decals
- Fine nail art brush
Instructions:
-
- Apply a base coat.
- Paint the nails with nude polish.
- Add gold accents on selected nails.
- Apply DuckTales decals.
- Use the fine brush to add details.
- Seal with a top coat for longevity.
Bambi’s Autumn Vibes
Embrace the fall season with this Bambi-inspired design. Featuring autumn leaves and Bambi on a matte green background, these nails are perfect for autumn. The subtle and aesthetic design makes it a great choice for those who love nature and Disney.

Consumables:
-
- Matte green nail polish (e.g., OPI “Sage Simulation”)
- Bambi and autumn leaves decals
- Fine nail art brush
Instructions:
-
- Apply a base coat.
- Paint the nails with matte green polish.
- Apply Bambi and leaves decals on accent nails.
- Use the fine brush to add additional details.
- Finish with a matte top coat for a smooth finish.
Bambi and Friends
This whimsical design features Bambi and his friends against a pastel gradient background. The nails are adorned with intricate artwork of the characters, and the addition of 3D gems adds a touch of elegance. The almond shape complements the soft and dreamy aesthetic, making it perfect for the fall season.

Consumables:
-
- Pastel gradient nail polishes (e.g., OPI “Mod About You” and “Gelato On My Mind”)
- 3D gems and nail glue
- Bambi character decals
- Fine nail art brush
Instructions:
-
- Apply a base coat.
- Create the pastel gradient background using a sponge.
- Apply Bambi and friends decals.
- Add 3D gems using nail glue.
- Finish with a top coat for a smooth and durable finish.
Queen of Hearts Drama
These nails are inspired by the Queen of Hearts from Alice in Wonderland, featuring bold red glitter and detailed portraits of the Queen and her court. The long coffin shape adds to the dramatic effect, while the heart accents and clear tips give it a playful touch.

Consumables:
-
- Red glitter nail polish (e.g., China Glaze “Ruby Pumps”)
- Queen of Hearts character decals
- Heart-shaped nail art accessories
- Fine nail art brush
Instructions:
-
- Start with a base coat.
- Apply the red glitter polish on most nails, leaving some clear tips.
- Apply Queen of Hearts decals.
- Add heart-shaped accessories using nail glue.
- Seal with a top coat for longevity.
Disney Mix and Match
This eclectic design features various Disney themes on each nail, from Toy Story to Monsters, Inc. The colorful and playful artwork is perfect for Disney fans who can’t choose just one character. The stiletto shape adds a trendy and edgy vibe to the overall look.

Consumables:
-
- Variety of colorful nail polishes (e.g., OPI “Do You Lilac It?”, “Big Apple Red”)
- Disney character decals
- Fine nail art brush
Instructions:
-
- Apply a base coat.
- Paint each nail a different color to represent various Disney themes.
- Apply character decals on each nail.
- Use the fine brush to add additional details.
- Finish with a top coat for a glossy finish.
Disney Villains
Embrace your dark side with this Disney Villains-inspired nail design. Each nail features a different villain, creating a bold and edgy look. The short almond shape makes it practical and easy to maintain, while the detailed artwork ensures it’s still eye-catching.

Consumables:
-
- Nude nail polish (e.g., Essie “Sand Tropez”)
- Villains character decals
- Fine nail art brush
Instructions:
-
- Start with a base coat.
- Paint the nails with nude polish.
- Apply Villains decals on each nail.
- Use the fine brush to add additional details.
- Seal with a top coat for durability.
Stitch and Friends
This design features Stitch and his tropical friends against a peachy background, perfect for those who love a touch of the tropics with their Disney nails. The almond shape and vibrant colors make it a cheerful and fun design for any occasion.

Consumables:
-
- Peach nail polish (e.g., OPI “Got Myself into a Jam-balaya”)
- Stitch character decals
- Fine nail art brush
Instructions:
-
- Apply a base coat.
- Paint the nails with peach polish.
- Apply Stitch and friends decals.
- Use the fine brush to add additional details.
- Finish with a top coat for a smooth finish.
Disney Princesses Silhouettes
This charming design features the silhouettes of beloved Disney princesses, including Aurora, Ariel, Jasmine, and Belle. The use of pastel colors and glitter accents makes these nails subtle yet elegant. The almond shape adds to the classy aesthetic, perfect for any Disney fan.

Consumables:
-
- Nude and pastel nail polishes (e.g., OPI “Passion” and “Mod About You”)
- Glitter top coat (e.g., Essie “Set in Stones”)
- Princess silhouette decals
- Fine nail art brush
Instructions:
-
- Apply a base coat.
- Paint the nails with nude polish.
- Use pastel colors to create the princess silhouettes.
- Add glitter top coat for sparkle.
- Seal with a top coat for a smooth finish.
Winnie the Pooh Friends
These nails capture the playful essence of Winnie the Pooh, featuring Eeyore and Tigger with colorful polka dots. The stiletto shape and vibrant colors make these nails stand out, adding a touch of fun to your autumn look.

Consumables:
-
- Nude and colorful nail polishes (e.g., Essie “Sand Tropez” and “Funky Limelight”)
- Eeyore and Tigger decals
- Dotting tool for polka dots
- Fine nail art brush
Instructions:
-
- Start with a base coat.
- Paint the nails with nude polish.
- Apply Eeyore and Tigger decals.
- Use the dotting tool to create colorful polka dots.
- Seal with a top coat for durability.
Mulan and Mushu
This design features the courageous Mulan and her trusty companion Mushu against a black and pink backdrop. The almond shape adds elegance, while the detailed artwork showcases the characters beautifully. The combination of colors and characters makes this a unique and bold choice.

Consumables:
-
- Nude, black, and pink nail polishes (e.g., OPI “Passion”, “Black Onyx”, and “Mod About You”)
- Mulan and Mushu decals
- Fine nail art brush
Instructions:
-
- Apply a base coat.
- Paint some nails black and others nude.
- Use pink polish to create cherry blossom designs.
- Apply Mulan and Mushu decals.
- Finish with a top coat for a glossy finish.
Toy Story Fun
This playful design features characters from Toy Story, including Woody, Buzz Lightyear, and the iconic aliens. The tips of the nails are decorated with patterns and characters, making this a fun and creative design for any Toy Story fan.

Consumables:
-
- Nude nail polish (e.g., Essie “Sand Tropez”)
- Toy Story character decals
- Fine nail art brush
Instructions:
-
- Apply a base coat.
- Paint the nails with nude polish.
- Decorate the tips with Toy Story character decals and patterns.
- Use the fine brush to add additional details.
- Seal with a top coat for durability.
Lady and the Tramp
Celebrate the classic Disney love story with this design featuring Lady and the Tramp. The navy blue background and detailed portraits make this a sophisticated and nostalgic choice. The short square shape is practical and perfect for showcasing the artwork.

Consumables:
-
- Navy blue nail polish (e.g., OPI “Russian Navy”)
- Lady and the Tramp decals
- Fine nail art brush
Instructions:
-
- Apply a base coat.
- Paint the nails with navy blue polish.
- Apply Lady and the Tramp decals.
- Use the fine brush to add additional details.
- Finish with a top coat for a smooth finish.
Monsters Inc. Fun
This design brings the fun and whimsy of Monsters Inc. to your nails. Featuring Sully, Mike Wazowski, and vibrant colors, this manicure is perfect for those who love bold and playful designs. The mix of green, blue, and yellow with detailed character artwork and 3D accents makes it a standout look.

Consumables:
-
- Nude, blue, green, and yellow nail polishes (e.g., Essie “Sand Tropez”, “Butler Please”, “Mojito Madness”, and “The Perfect Cover Up”)
- Monsters Inc. character decals
- 3D eye stickers
- Fine nail art brush
Instructions:
-
- Apply a base coat.
- Paint the nails with nude polish, and add color accents with blue, green, and yellow.
- Apply the Monsters Inc. decals.
- Add 3D eye stickers for a fun effect.
- Seal with a top coat for a glossy finish.
Disney Princess Silhouettes – Part 2
This design is a variation of the Disney princess silhouettes, featuring Aurora, Ariel, Jasmine, and Belle in a more minimalist style. The subtle glitter background adds a touch of magic, making these nails both elegant and playful. The shorter almond shape is practical and chic.

Consumables:
-
- Nude and pastel glitter nail polishes (e.g., Essie “Vanity Fairest” and “Set in Stones”)
- Princess silhouette decals
- Fine nail art brush
Instructions:
-
- Apply a base coat.
- Paint the nails with nude polish and add a glitter top coat.
- Apply the princess silhouette decals.
- Use the fine brush to add additional details.
- Seal with a top coat for a smooth finish.
Timon from The Lion King
Celebrate the playful spirit of Timon from The Lion King with this fun and glittery design. Featuring a detailed Timon decal and golden glitter accents, these nails are perfect for adding a touch of Disney magic to your fall look. The stiletto shape adds elegance and drama.

Consumables:
-
- Nude and gold glitter nail polishes (e.g., OPI “Samoan Sand” and “Glitzerland”)
- Timon decal
- 3D rhinestones
- Fine nail art brush
Instructions:
-
- Apply a base coat.
- Paint the nails with nude polish and add golden glitter accents.
- Apply the Timon decal.
- Add 3D rhinestones for extra sparkle.
- Seal with a top coat for durability.
101 Dalmatians
This design features the adorable puppies from 101 Dalmatians with a chic and modern twist. The stiletto nails are adorned with black and white spots, a cute puppy decal, and sparkling rhinestones. The combination of black, white, and nude makes it a classy and playful look.

Consumables:
-
- Nude, black, and white nail polishes (e.g., Essie “Sand Tropez”, “Licorice”, and “Blanc”)
- 101 Dalmatians decals
- 3D rhinestones
- Fine nail art brush
Instructions:
-
- Apply a base coat.
- Paint the nails with nude polish and add black and white spots.
- Apply the puppy decal.
- Add 3D rhinestones for a touch of sparkle.
- Seal with a top coat for a glossy finish.
Save Pin